29. junij 2010

Inhabitat's Week in Green: a US team wins the Solar Decathlon!

Inhabitat's Week in Green: a US team wins the Solar Decathlon!:
Each week our friends at Inhabitat recap the week's most interesting green developments and clean tech news for us.


This week Inhabitat reported live from the scene of the Solar Decathlon in Madrid as 17 stunning solar-powered houses competed for the title of the world's most energy-efficient prefabricated house. The winner was just announced this evening and we're thrilled to see that an American team won: Virginia Tech's shape-shifting Lumenhaus. Considering that German teams have won the American Solar Decathlon for three years running now, we're really proud of the Virginia Tech team for their big win! We're also happy to see that several of our favorite solar houses from the show made it to the top ranks, including Germany's elegant IKAROS house, the ultra-efficient Armadillo Box, and Finland's beautiful wooden Luukku house.

We also watched sustainable transportation soar to new heights this week as the world's first solar-powered blimp prepares to fly across the English Channel. Not to be outdone, the US Army unveiled plans for an ultra-long range hybrid airship that is capable of flying for three weeks at a time.

In other news, renewable energy is heating up around the globe as the EU recently announced that it will import solar energy from the Sahara Desert within 5 years. We also saw a beautiful solar powered flower sprout in Southern California and looked at the worlds first solar-powered soccer ball, which could help the blind play soccer. Finally, we caught wind of an innovative breathing mask that filters CO2 from the air, converts it into energy, and stores it to power a cellphone or portable music player.

Hacked N900 blazes through Froyo

Hacked N900 blazes through Froyo:


While the various and sundry Android manufacturers are all scrambling (or casually strolling) toward official Android 2.2 updates for their manifold handsets, someone managed to get Google's Froyo running on the Nokia N900. Turns out, the two are a pretty great pair, with some super speedy browsing (like, really fast) and decent hardware support outside of an unfortunate lack of memory card support. Hit up the video after the break to see it in action, the browser starts kicking around the 4:45 mark.

17. junij 2010

ViewSonic streams Netflix, other stuff with NexTV VMP75 networked media player

ViewSonic streams Netflix, other stuff with NexTV VMP75 networked media player:

The world needs another network media player like it needs another eight billion barrels of oil floating around in the Gulf of Mexico, but if you're somehow still struggling to decide on one of the many, many options available to you, ViewSonic has an alternative up for consideration. The new NexTV VMP75 is a rather compact set-top box, donning a glossy black finish and proud support for streaming Netflix Watch Instantly content. You'll also get local and network playback of whatever content you've got laying around on your nearby hard drives, and around back, you'll find an Ethernet socket (WiFi is optional), eSATA / USB combo port, a dedicated USB socket (for connecting thumb drives and external HDDs), a S/PDIF audio port, HDMI output and an AV aux plug. ViewSonic claims that you can also stream content from YouTube, SHOUTcast, Flickr and Live365.com, and there's even an inbuilt web browser if you take pleasure in (presumably) torturous experiences. All you? If so, it's up for pre-order right now at Amazon and Newegg for $129.99.

14. junij 2010

Google Announce Blogger Template Designer Out Of Draft

Google Announce Blogger Template Designer Out Of Draft:

Google announced on their blog today that their Blogger Template Designer is now available for everyone to use. It has been in “Draft” since March, meaning you could sign up to play around with the template designer but it is now available to everyone by default.

If you haven’t heard of it before, Blogger is a blogging platform that’s free to use and a very easy way to have a blog up and running in minutes. It’s probably fair to say it doesn’t have the same level of community support or features as Wordpress, but it’s not a bad starting point from which to jump into the world of blogging.

The Blogger Template Designer allows anyone to customize the look and layout of their Blogger blog. The post on the Blogger Buzz blog lists the new features, which include:


  • 19 new starting templates, with more to come.

  • All designs are CSS based, but there is no requirement to know CSS or HTML.

  • All complexity is hidden from the user, they just pick colors, fonts, backgrounds

  • Blogger have collaborated with iStockphoto to offer hundreds of background images for free.

  • A single control to change all your design’s colors.

  • A real-time preview sits below the design control panel.

  • Advanced users can write their own CSS and override a template design’s CSS.

  • Cross-browser support with Internet Explorer, Chrome and Firefox. (I didn’t see any mention of Safari)

You can try out and play around with the Template Designer here and can apply the design to a new or existing blog. The editing control panel is simple with four sections Templates, Background, Layout and Advanced where the user can make changes.


Templates


Background


Layout


Advanced


Under the editing control panel, users can see how the changes affect their blog in real time.


FullEditor


Related Posts

  1. Markup Separation with Template IT
  2. Thoughts on using DOM as a template engine
  3. Keep Your Template Logic in the Template


"

11. junij 2010

Drift Innovation helmet cam shoots 1080p, sports a rotating lens and built-in LCD

Drift Innovation helmet cam shoots 1080p, sports a rotating lens and built-in LCD:

Drift Innovation's HD170 is far from the 'world's first' HD helmet cam -- heck, it's not even the first that does 1080p -- but we'll admit it's an attractive proposition on paper thanks to a tiny 1.5-inch color LCD and built-in speaker. While those let you verify your death-defying stunts were captured appropriately, an adjustable lens promises more freedom in the way you attach it, too, and at $329, the rest of the specs (30fps, H.264 compression, 5 megapixel stills, 1110 mAh battery, up to 32GB SDHC card) are more or less competitive with the other elephants in the room. Though we certainly can't recommend it without getting some hands-on time first, Drift's got some video samples after the break if you'd like to see how well the POV cam handles the open road and some skydiving Gs.

6. junij 2010

Build Kick-Ass Practical CSS3 Buttons

Build Kick-Ass Practical CSS3 Buttons:
What once required background images and icons can now be created with plain-old CSS. Because modern browsers have access to things like box shadow, gradients, rounded corners, text-shadows, and font-face, we can finally take advantage of this and remove any need for images, when creating visual elements, such as buttons! I’ll show you how in today’s video tutorial.


Video Tutorial


Final Code


<!DOCTYPE html>

<html lang="en">
<head>
<meta charset="utf-8">
<title>CSS3 Buttons</title>
<style>

/* CUSTOM FONT */
@font-face {
font-family: 'EfonRegular';
src: url('font/EFON-webfont.eot');
src: local('EfonRegular'), url('font/EFON-webfont.woff') format('woff'), url('font/EFON-webfont.ttf') format('truetype'), url('font/EFON-webfont.svg#webfont') format('svg');
font-weight: normal;
font-style: normal;
} 

body {
width: 400px;
margin: 200px auto;
background: #666;
}

.button {
width: 400px;
height: 100px;
line-height: 100px;
color: white;
text-decoration: none;
font-size: 50px;
font-family: helvetica, arial;
font-weight: bold;
display: block;
text-align: center;
position: relative;

/* BACKGROUND GRADIENTS */
background: #014464;
background: -moz-linear-gradient(top, #0D658E, #0C577A 50%, #014D71 51%, #003E5C);
background: -webkit-gradient(linear, left top, left bottom, color-stop(0, #0E658E), color-stop(.5, #0C577A), color-stop(.5, #014D71), to(#003E5C));

/* BORDER RADIUS */
-moz-border-radius: 10px;
-webkit-border-radius: 10px;
border-radius: 10px;

border: 1px solid #368DBE;
border-top: 1px solid #c3d6df;

/* TEXT SHADOW */

text-shadow: 1px 1px 1px black;

/* BOX SHADOW */
-moz-box-shadow: 0 1px 3px black;
-webkit-box-shadow: 0 1px 3px black;
box-shadow: 0 1px 3px black;
}

/* WHILE HOVERED */
.button:hover {
background: #014464;
background: -moz-linear-gradient(top, #0c5f85, #0b5273 50%, #024869 51%, #003853);
background: -webkit-gradient(linear, left top, left bottom, color-stop(0, #0c5f85), color-stop(.5, #0b5273), color-stop(.51, #024869), to(#003853));
}

/* WHILE BEING CLICKED */
.button:active {
-moz-box-shadow: 0 2px 6px black;
-webkit-box-shadow: 0 2px 6px black;
}
/* FONT GLYPH (MOSTLY FOR FUN) */
.button:before {
font-family: EfonRegular;
content: 'v';
color: #09232F;
font-size: 90px;
float: left;
margin-left: 35px;
margin-right: -10px;
text-shadow: 0 1px 0 #4190AF;
}

</style>
</head>
<body>
<a href="#" class="button"> Follow Me </a>
</body>
</html>


Conclusion


Button

The truth is that it would probably be smarter to use a tiny image for the Twitter-bird icon. But, the goal was to achieve this effect with all CSS! What do you think?

Rethinking Forms in HTML5

Rethinking Forms in HTML5:

While there are many changes for the better in the HTML5 specification, there is no better bang for the buck for the data driven website than the transformation of forms. These simple changes will transform how you enter, validate, process, and even display inputs. You will be able to create more usable web applications with less code and less confusion.


Introduction What’s in Store?


“In the recent past, the majority of innovation in forms have come from the use of JavaScript, rather than old fashioned HTML. While there is nothing wrong with using JavaScript to enhance forms, it does bring its own usability along with many development headaches.”


HTML 5 is still undergoing changes before it is finalized. If you look at the spec, you will see that there is still a last call for comments along with statements, such as, Implementers should be aware that this specification is not stable. Furthermore, particularly for the purposes of this tutorial, focusing on the changes to forms, browser implementation is spotty to say the least. That said, the changes on the horizon are worth examining today. While the changes are major in scope, the implementation for developers look to be rather easy. In this tutorial, we will take a high level overview of these ground breaking changes, and think about how they will impact the nature of user input.


In the past, changes to forms have been relatively minor. If you go back to the HTML 3.2 spec, which was finalized in 1997, you will see the same basic form inputs that you use today. Select, textarea, radio, checkboxes and text were available then. A generation of web developers have grown up writing to these same standards. While later versions of the specification brought changes to forms, such as the fieldset, label, legend, and form actions such as onsubmit or onchange, the way we deal with user input has remained somewhat static. In the recent past, the majority of innovation in forms have come from the use of JavaScript, rather than old fashioned HTML. While there is nothing wrong with using JavaScript to enhance forms, it does bring its own usability along with many development headaches. For instance, there are many different ways that we can validate forms using JavaScript, but what happens when a user does not have JavaScript enabled? We further have to apply logic to our server side scripts. In the end, we have a not so consistent way of handling user input. HTML 5 doesn’t address every innovation headache for forms in the past 13 years, but it does give us plenty of tools to

make our jobs much easier, and allows us to produce much more consistent forms.


There are three basic changes that we should examine. First, we will look at the changes to the input elements, such as autocomplete or autofocus. The second is changes to the input states, and there are quite a few! Finally, we will examine the new form elements. It is important to restate that the specification is in flux; so I wouldn’t be surprised if, in the future, there are subtle changes to what we are discussing. That’s what makes this fun!


Changes to Input Elements: A Whole New Playground.


Input attributes are those items that you place in inputs to explain what the input is doing. For instance:


<input name="form_text" id="form_text" type="text" value="foo" size="10" maxlength="100">

In the example above, the input attributes are value, size, and maxlength. These have been around for quite some time. HTML 5 doesn’t change the concept of having input elements, but rather adds quite a few more. There does appear to be at least one subtraction, or rather substitution, and that is the change of disabled now appears to become readonly. The spec does not go into detail to the change, but if I was a betting man, the change would allow event handlers, such as onblur, to fire – which a disabled element prevents.


The new attributes include autofocus, autocomplete, list, required, multiple, pattern, min and max, step and placeholder. I think of these as two different flavors of elements. The first flavor enhances the experience for the user, while the second enhances the development experience. What I mean by this, is autofocus, autocomplete, list, multiple, and placeholder helps the user experience in selecting items, or perhaps by giving a description of what the form input is looking for, or by aiding in completing the form. required, min and max, pattern and step add to the development experience by saying what should be in the form itself.


Autofocus


What each of these new attributes do is relatively easy to understand. For instance:


<input name="form_text" id="form_text" type="text" value="foo" autofocus>

Above, the autofocus element focuses the text input on page load. This means that as soon as the page loads, this text input is ready to take an entry. You can start typing right away, as this element has the focus of the document. Something that we used to do in JavaScript in a line or so, can now be done with a single word.


<input name="form_text" id="form_text" type="text" value="foo" autocomplete="off">

In the above example, by turning off autocomplete, you keep the browser from filling in the form field from a previous value. Nothing bugs me more than seeing my credit card number come up in a form as soon as I type a digit. The default for autocomplete is to be on, so the only time you need to use this element is when you want to prevent the form field from completing from previous entries. It adds to the user experience by keeping sensitive information from just “popping up.”


List


<input name="form_url" id="form_url" type="url" list="url_list">
<datalist id="url_list">
<option value="http://www.google.com" label="Google">
<option value="http://www.nettuts.com" label="NetTuts">
</datalist>

The list attribute is very cool. Essentially, you provide a datalist, and it will create a drop down from your text input. Think of it as a natural auto complete. Take it a bit further, and instead of having to add a JavaScript library for a quick look up, based on key entries, you could easily just add an “onchange” event handler, with an AJAX post, and you end up with a drop down that gets more specific as the user types into the box. With HTML 5, this functionality an be created with just a few lines.


Multiple


<input name="form_url" id="form_url" type="url" list="url_list" multiple>

The multiple attribute allows you to select multiple items from your datalist. For instance, you might have a form which sends messages from your website. By using the multiple element, you can allow the user to select multiple recipients to send that message. Again, this is something we can accomplish with a bit of JavaScript now, but with HTML 5, we only have to add a single command to the form.


Placeholder


<input name="form_text" id="form_text" type="text" placeholder="Type Here">

The placeholder attribute is something we have been doing for years with a touch of JavaScript. What this does is, as soon as the input is focused, Type Here will vanish. If there was no change to the text on blur, then Type Here will reappear. Once again, we are taking some JavaScript out of the picture to enhance the user experience.


Required


These next new attributes all enhance our development. With the exception of “step,” each aids in the validation of the user input.


<input name="form_text" id="form_text" type="text" value="foo" required>

The required attribute is exactly as it sounds. I, the developer of this webpage, require you to fill out this form prior to hitting submit. This is the basic form validation that we use today with JavaScript. What took a library before to add a required entry, now takes a single word in the form.


RegEx


<input name="form_text" id="form_text" type="text" value="foo" pattern="[0-9][A-Z]{3}">

Of all the new form attributes, this is the one that I am most excited about. Mr. Form, let me introduce you to my good friend, Regex. Thats right, we can validate form entries based on regular expressions. While this one is going to be mystifying at first, as you learn regular expression, the possibilities of validation now become limitless.


Validation


<input name="form_range" id="form_range" type="range" min="1" max="10" step=".5" value="5" >

I have lumped the final three into one example, as they all deal with number validation – or the range of numbers that we can include.


  • Min: is the minimal value that an input will take.

  • max: is the maximum input value the input will take.


Each of these are dealing with numerical values. Dont confuse them with maxlength, which deals with the number of characters an input will take. The step element is just as it sounds. As you select a numerical value, step it up by .5 or down by .5 — meaning this input type will have the possible values of 1, 1.5, 2, 2.5, and so on.


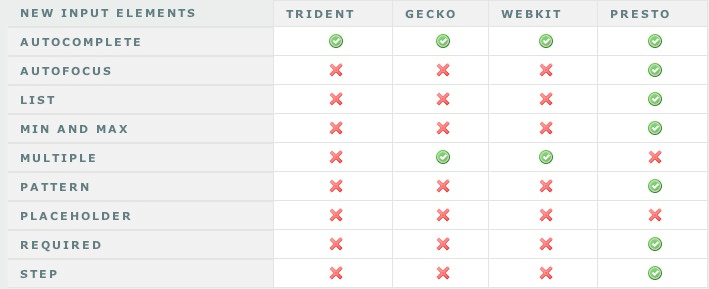
As of right now, to the best of my knowledge, browser support is somewhat spotty on these attributes. Heres a quick chart showing what I was able to find on the implementations.


Changes to Input Types: A Whole Lot of Love.


There are eight new input types, not counting all the new date and time types, which for our purposes, I am lumping into one. Its important to note that the browsers which have not implemented the new input types will degrade to a type of text on each that I have tested. What the new input types bring is an ability to validate user input based upon the type that you are using. There is also more validation to come which I will be discussing in the next two sections. Each of the new input types allows us to separate from a text field to something more specific. For instance, to take integer or float values prior to HTML 5, we mostly used an input type of text. Just from the annotation, it is counter intuitive for beginners. By being more specific, we then have better visual control over our interface, as the more specific the element in HTML, the greater control you have from within the CSS, and the easier it is to define those visual elements. In addition, with the new specific input types, browsers are now able to fine tune what the input range should be. Finally, with the advent of mobile computing, we are able to make web application form elements which can be styled to look like natural applications, or can shape the keyboard that we are using.


Let’s look at number handling first:


Numbers, Integers and Floats


<input name="form_range" id="form_range" type="range" min="1" max="10" step=".5" value="5" >

<input name="form_number" id="form_number" type="number" min="1" max="10" >

Each of these input types allows us to play with numbers, and when we post the forms, we should be sure that we have those float values for our server side processing without the added JavaScript validation. Simply put, for each of these types, we are expecting to get numbers back within the range that we define and with the step that we want. The difference between the two types is how they are displayed. While I am waiting to see implementation on the number type, I would expect either a roll, or a text box, or possibly a type of a select with numbers. The range type is a bit different, in that it looks like a sliding value, similar to what you would expect to see for a volume control.


Dates and Times


<input name="form_date" id="form_date" type="date">

<input name="form_month" id="form_month" type="month">

<input name="form_week" id="form_week" type="week">

<input name="form_time" id="form_time" type="time">

<input name="form_datetime_local" id="form_datetime_local" type="datetime-local">

Another big relief to standardize your backend development is the new date and time input types. From the Opera implementation that I have seen, each shows a calendar drop down, which allows your user to select a date. Again, we can validate on our webpage that the input is in the format that we are expecting. Each does exactly what you would think; you are selecting a month, week, day, or time. The one that is a little different is the datetime-local, which is showing the date and time without your timezone offset. For instance, if you are selecting a flight, the datetime-local would show the time and date in the city that you are going, which is not necessarily the timezone that you are currently in.


Urls, Emails, Telephone, and Color


<input name="form_url" id="form_url" type="url" list="url_list">
<datalist id="url_list">
<option value="http://www.google.com" label="Google">
<option value="http://net.tutsplus.com" label="NetTuts+">
</datalist>

<input name="form_email" id="form_email" type="email" list="email_list" multiple>
<datalist id="url_list">
<option value="jane.doe@test.com" label="Jane Doe">
<option value="john.doe@test.com" label="John Doe">
</datalist>

<input name="form_telephone" id="form_telephone" type="telephone">

<input name="form_color" id="form_color" type="color">

Each of these input types are descriptive. The URL and Email types both have the validations of valid url patterns and valid email patterns. The telephone does not, however, conform to any specific pattern. It just strips line breaks. If you want to enforce a validation pattern on the telephone field, you can always use the pattern element. Each of these elements minus color will also take the list attribute, minus color. Color is the oddball of the bunch; I can see its practical use, where you can select a color from a fancy pull down that shows colors, and enforce the text entry of something like #000000, but it doesn’t really fit the rest of the changes, in my opinion. Its like playing which one is not like the others.


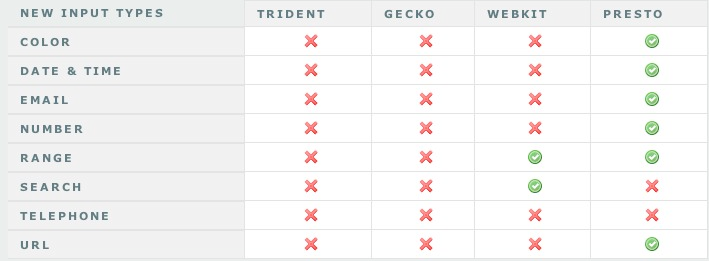
Like the attributes, the input type browser implementation is quite spotty. My iPhone seems to support more of these than Safari, which is a bit funny to me. This is the best that I could find, as to support.


Changes to Form Elements: Not Quite as Drastic


The number of changes to the form elements is not as drastic as input attributes and types. That said, there are a few new elements to be aware of. We have already covered datalist – it is how we define what will be selected from a list element call – but we haven’t seen keygen, output, progress, or meter. Outside of keygen. these aren’t quite as self explanatory as the new attributes. Lets dig into these just a bit.


Keygen


<keygen name="key">

This one is a bit confusing. It does not generate a public key for you. Instead, it is a key pair generator control. Once the form is submitted, it packages the key pair to store the private key in the local key store, and sends the public key back to the server. It will generate the client certificate and offer it back to the user to download. Once downloaded and stored with the private key, you can then authenticate services, such as SSL or certificate authentication.


Output


<input name="number_1" type="number"> + <input name="number_2" type="number"> =
<output onforminput="value = number_1.valueAsNumber + number_2.valueAsNumber"></output>

Think of the output element as a text area on steroids. What you can do is calculate from two number type text inputs and output that calculation without ever submitting the form back to the server. If you just return false onsubmit, in the above example, it will calculate number_1 plus number_2, and provide you the answer. Like many things discussed in this tutorial, this is something that we can accomplish today with JavaScript, but this really lessens the amount of code that we need to write in the future.


Progress and Meter


<progress id="p" max=100>0% </progress>

<meter min=0 max=20 value=12 optimum=10>12cm </meter>

The final two new elements are progress and meter. They are similar, but with one difference. Progress is meant to be used to measure the progress of a specific task. For instance, if you might have five more pages to complete before a survey is done, you would show the progress element in that area. The meter, on the other hand, is a measurement of something. You might want to show the remaining disk space a user has left. You would use the meter to display that measurement. There are new boundary elements, such as low, high and optimum. These supersede the min or max elements; so if they exceed them, they become the new lower and upper limits of the form.


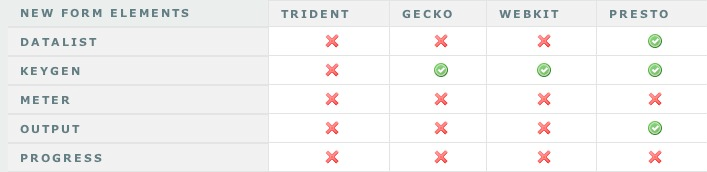
Like the rest of the HTML 5 form changes, browser implementation is poor at the moment. Heres what seems to work, and what doesn’t (at the time of this writing).


Conclusion


From what I can see, there is no reason to not start using HTML 5 forms. The input elements and types all degrade nicely, even in IE6, where they are either ignored as elements, or degraded to text inputs. We are going to have to wait a while for the validation attributes to become a reality, but with that said, there are still some uses today without those advantages. For instance, the iPhone modifies the keyboard if you are using the url, email, or number types. The range input type is already supported in WebKit browsers, so you could be the first kid on the block with a number slider that works without JavaScript. The spec is rapidly finalizing, and browsers are catching up rather quickly to the paradigm shifts. There is no time like the present to at least begin playing with these new toys! What do you think?


"

7 Simple and Useful Command-Line Tips

7 Simple and Useful Command-Line Tips:

One of the most useful, but under-used, tools a web developer has is the command-line. The terminal often scares people away; so here’s where we demonstrate some of the most useful day-to-day commands.


1. The Basics

If you’re new to the command-line, you’re going to want to know a few things to help find your way around.


Changing directories


You can change to a different directory with the following:


cd ../relative/path/to/other/directory/or/file

cd /absolute/path/to/other/directory/or/file

If you get lost, you can go back to your “home” directory with the command “cd ~”.


Listing files and directories


If you need to know what files a particular directory contains:


ls ../relative/path/to/other/directory/or/file

ls /absolute/path/to/other/directory/or/file

You can use the “-l” switch to show the contents as a list, and the “-A” switch to also show hidden files (on Linux based machines, files and directories whose name begins with a “.” are considered ‘hidden’).


Showing your current directory


Sometimes you just want to know what directory you’re currently in!


pwd

This will display a path to your current folder.


Copying files


Copying files from one place to another is quick and easy:


cp /files/or/directories/to/copy /directory/to/copy/to/

You can also use the “-R” switch when copying to make it recursive, so all sub-directories and files are also copied.


But typing is slow, and what if I can’t remember the exact path or command?


Most of the time, the command-line has tab-completion enabled, so you can start typing the name of a command or a file path, press tab, and it will complete it for you. If there is more than one option, it won’t complete for you but if you double-press tab, it will list the options.


Tab-completion makes typing out long file paths much faster!


How do you know what options a command has?


There are a few ways to determine what options a command has. Most commands have a –help (or -help, or -h) operator available, which lists the possible arguments and options you can use:


cd --help

If you find that the brief help given by the –help operator isn’t enough, you can read more detail with the man program:


man mysqldump

Which will tell you all about the “nano” program. Simple commands like “cd” may not have an entry in man.


2. Making a Database Backup (with GZip Compression)


Backing up your database is something you should do often. Like most things, there are a lot of ways to do this, but using the command-line is one of the best. Why? Because it helps you get around potential problems like execution timeouts for tools like phpMyAdmin, and potential network dropouts from using a local administration tool like MySQL Workbench.


The command to run the backup is fairly small, but may require some explaining:


mysqldump -u mysqluser -p mysqldatabase

Now, to explain what’s going on here! The “mysqldump” program is a tool for creating database backups. The parameters being used are:


  • “-u” switch means you’re going to specify a username to connect with, which must follow, like “-u mysqluser” above

  • “-p” switch means you’re either going to immediately specify the password to use (with no space), or it’ll prompt you for one

  • The final parameter used in the example above is the name of the database to backup (of course!)


If you ran the command above, you would’ve seen the contents of your database go whizzing by on the screen. That’s good, because we know that part works (actually connecting to the database), but it’s also bad, because… where did it go? Answer: nowhere! It scrolled past, and that was it. Now we need to capture it and put it in a file.


To place the contents of the output into a file, for back-up purposes, we need to use what’s called a redirection.


mysqldump -u mysqluser -p mysqldatabase > db_backup.sql

So we added a redirecter, and the filename we wanted the output to go into. Now you should be able to see a file named “db_backup.sql”, and if you open it you can see a SQL script with the structure and content of your database ready for restoration or migration.


One last thing that could be useful for a backup, is compressing the SQL script. For this example, I’m going to use GZip compression, because it’s quite common, but you could also use Bzip2 or something else.


To add compression into this command, we just do what’s called piping. We pipe the output from the mysqldump through gzip, and then redirect it into the file we want, like so:


mysqldump -u mysqluser -p mysqldatabase | gzip > db_backup.sql.gz

I also added the “.gz” to the filename, so I know it’s compressed and not just plain text anymore (it’ll also be smaller!)


3. Restoring from a Database Backup (with GZip Compression)


So you’ve got a backup of your database (either using the method above, or some other way), and something has gone wrong and you need to restore, or you’re migrating it to a new server. You could use one of the other tools mentioned before, but in the example of phpMyAdmin, what if your database backup file is bigger than the allowed upload size? Well luckily, the command-line doesn’t mind.


The command to restore is very similar to the one for backing up. Firstly, without GZip compression:


cat db_backup.sql | mysql -u mysqluser -p mysqldatabase

We use the “cat” command to output the contents of the backup script, and pipe its contents into the mysql program. As you can see, the mysql program takes the same options as the mysqldump one does in section two.


Now if the script was GZip compressed, we can’t just output its contents into mysql, as it will be compressed data instead of a nice SQL script. So we do the following:


gunzip < db_backup.sql.gz | mysql -u mysqluser -p mysqldatabase

See, it's very familiar, just switched around a bit.


What's happening here is we run 'gunzip' too and redirect the backup script into it to be decompressed. We then pipe the decompressed output into the 'mysql' program.


4. Find / Replace in a Text File


Sometimes you have a big file, like maybe a database export, and you need to do some find / replace on it... but it won't open in any of your text editors, because your machine runs out of memory trying to open it! Well, here's a way around that, by using the command-line and a little regular expressions.


The way this works is to output the contents of the SQL script (or whatever file you're using), pipe it through a program called 'sed,' which is specifically form manipulating streaming content, and then redirect that output into the new file. Sound complicated? Well... I guess it is a little, but the command itself looks simple!


cat original_dump.sql | sed s/Japheth/Japh/ > new_dump.sql

The new part here is really the 'sed' program. Basically what it's doing is taking input and matching the first pattern (in this case, my name, 'Japheth'), and replacing it with the second pattern (in this case, a shortening of my name, 'Japh'), then outputting that.


5. Securely Copying Files to / from a Server (over SSH with SCP)


If you're working on the command-line and need to copy a file, especially if you need to do it securely, why go and fire up your FTP client? Just use a program called Secure Copy, or SCP, which is especially for doing remote file copying securely. Secure Copy uses SSH to copy the files, so you need to make sure you can connect to the remote computer via SSH first (I'll talk about this a little more at the end of the article, so hold that thought).


The syntax of the scp command is similar to that of the cp command covered in section one, with the addition of the hostname of the remove computer and the username to connect with:


scp /path/to/local/file username@hostname:/path/to/copy/to/

The bits to note are 'username@hostname:', which, as I explained above, are the username to use and hostname to use when connecting. You will be prompted to enter the password for that user, and you also will get a progress indicator for the copying so you can see how it goes.


You can use the '-r' switch (note: it's lowercase for scp, uppercase for cp) with secure copying to make it recursive. Also, if this is the first time using SCP or SSH to connect to the remote machine, you may be asked to accept an RSA fingerprint for security, which you should accept (assuming you're certain you're connecting to the correct server).


It's worth mentioning that this works both ways. You can also copy files from the remote computer to your local machine by switching the arguments around:


scp username@hostname:/path/to/remote/file /local/path/to/copy/to/

If you're SSHed into one web server, and you want to copy files to another one, you can use this command to copy the files directly without having to download them to your local computer first!


6. Finding Specific Files in a Large Project


Finding a file with a particular name


Want to find a specific file but not sure where in the many directories of your project it's hiding? (or even if there's more than one!)


find ./ -iname 'index.php'

The 'find' command is for locating files within a directory heirarchy. It has many options, so its uses are quite varied. Here I've specified to search in the current directory with './', and used the '-iname' switch, which means to search for a file with a name like the one I supply. There is also a '-name' switch, but the '-iname' switch is case-insensitive, so it'll find INDEX.php as well.


Finding a file with particular content


Ever known that you had written a function for something, but can't remember which file it was in?


grep -iR myFunction ./

'grep' is a program for printing out lines that match a particular pattern. You can provide it with some switches, like the '-i' for making it case-insensitive, and '-R' for making it recursive in my example. Then provide a pattern, and the path to search in (here I'm searching the current directory with './'). This example will show the filename and the line in that file for any matches it finds to 'myfunction' (case-insensitve because of the '-i').


If your projects are Subversion working copies, you may find that it's annoying to see results from the '.svn' directories. To exclude particular directories from the search, use the '--exclude-dir=' switch, for example '--exclude-dir=.svn'.


7. Performing Bulk Actions on Specific Files


Now we know how to find particular files; what if we want to do particular things with those files? For example, I often work on a Mac, and find that when I save files to Windows shares or Linux Samba shares on the network, Mac OS X kindly litters '._filename' files everywhere. So I like to be able to clean these up regularly.


To find such files, I use both methods from the previous section for finding files with a particular name:


find ./ | grep '\.\_.*'

We're finding a way to output all files in the current directory (recursively), and are then piping the output to grep, which ensures that it matches my regular expression. The regular expressions just says, 'match anything that starts with a literal . followed by a literal _ followed by 0 or more of anything else.' Run it like so to make sure you see the desired files.


Now to do something with all the files you captured from that command, you wrap it with back-quotes (``). If I wanted to delete all of them:


rm -f `find ./ | grep '\.\_.*'`

I have the 'rm' command (to remove, or delete, files) with a '-f' switch (which means to force a delete without asking for confirmation), and it will run for each file returned by the command within the back-quotes!


I feel it would be irresponsible not to mention here that you should be very careful using the 'rm' command. If you use the 'rm' command with the '-f' switch, make sure you know exactly what you're going to be deleting, and that you really want it gone! If you use '-f', you won't get a second-chance.


How do I get Command-line Access to my Web Host?


I mentioned earlier in the article about connecting to a remote computer via SSH. A lot of these commands are most useful when used on your web server, which likely runs linux, so you'll need to be able to connect to the command line. The way to do so is by using a program called SSH, which does it securely.


On Mac OS X, or on linux, you can run SSH from the Terminal application:


ssh username@hostname

If you're on Windows, you'll need to use a freely available program called PuTTY.


You will be prompted for your password when you are connecting.


If you do not have SSH access to your web host already, you will most likely be able to request it, and they will set it up for you.


In Summary...


Like most things, 'you don't know, what you don't know.' It might seem difficult to discover how to use the command-line; but there's a huge amount of power available to you once you wrap your head around it! Hopefully, this article will get you started exploring! Any questions?


"

4. junij 2010

Same as it ever was: you can't tether an iPhone to the iPad

Same as it ever was: you can't tether an iPhone to the iPad: "

This isn't so much news as it is a public service announcement: even in markets where iPhone tethering has launched, you've never been able to use it to connect to an iPad, and you won't be able to when AT&T flips the switch on tethering with the release of OS 4. That's clearly not AT&T's fault, it's Apple's -- the iPhone inexplicably supports only USB and Bluetooth for sharing its internet connection, even though jailbroken apps like MyWi prove that a WiFi connection is totally doable and countless other handsets already support WiFi routing. And iPad doesn't support using another device as a Bluetooth modem, either. And as long as you're paying the tethering fee, there's no reason why AT&T wouldn't want you tethering the iPad; you'll certainly be able to do it with any phone in AT&T's lineup that can create a WiFi hotspot, after all, and we're sure they'd be happy to take your overage cash once you hit 2GB regardless of the device you're using to gobble the data.


In the meantime, you know what you can tether to an iPad? A phone running Froyo, for one -- Google was certainly happy to show off that capability back at IO. Or pretty much any device running S60 from the last several years. Or a Palm Pre Plus... yeah, you get the idea.

Same as it ever was: you can't tether an iPhone to the iPad originally appeared on Engadget on Thu, 03 Jun 2010 19:38:00 EDT. Please see our terms for use of feeds.

Permalink Gizmodo | sourceTechFlash | Email this | Comments"