Alright, stick with us here. For some reason, ASUS decided it best to name its freshest e-reader the Eee Tablet, while its downright magical tablet goes by Eee Pad. Got all that? Good. The Eee Tablet (again, not to be confused with the Eee Pad tablet) is half e-reader, half note taker, and it's an interesting twist on a played product category. We took a few precious minutes to experiment with the device here on the Computex show floor, and overall, we like what we're seeing. Gone is the painfully slow E-Ink page refresh that Kindle owners are so accustomed to, with this particular LCD proving deliciously quick at changing screens. The only hang-up comes when you attempt to flip through too many pages, too fast -- we managed to harness a loading wheel on two occasions, both of which took around six or eight seconds to vanish and the next page to finally appear. We also confirmed that the screen only works with the included stylus, much like pen-enabled Wacom tablets. That said, the bundled stylus was perfectly weighted, and the Eee Tablet responded well to our doodling. Speaking of weight, the model shown here in Taipei was shockingly heavy (at least iPad-level heavy), while the 10-inch EP101TC was markedly less hefty. Enough chatter -- have a look at our hands-on video just past the break.
31. maj 2010
ASUS Eee Tablet preview
ASUS Eee Tablet preview:
Alright, stick with us here. For some reason, ASUS decided it best to name its freshest e-reader the Eee Tablet, while its downright magical tablet goes by Eee Pad. Got all that? Good. The Eee Tablet (again, not to be confused with the Eee Pad tablet) is half e-reader, half note taker, and it's an interesting twist on a played product category. We took a few precious minutes to experiment with the device here on the Computex show floor, and overall, we like what we're seeing. Gone is the painfully slow E-Ink page refresh that Kindle owners are so accustomed to, with this particular LCD proving deliciously quick at changing screens. The only hang-up comes when you attempt to flip through too many pages, too fast -- we managed to harness a loading wheel on two occasions, both of which took around six or eight seconds to vanish and the next page to finally appear. We also confirmed that the screen only works with the included stylus, much like pen-enabled Wacom tablets. That said, the bundled stylus was perfectly weighted, and the Eee Tablet responded well to our doodling. Speaking of weight, the model shown here in Taipei was shockingly heavy (at least iPad-level heavy), while the 10-inch EP101TC was markedly less hefty. Enough chatter -- have a look at our hands-on video just past the break.
Alright, stick with us here. For some reason, ASUS decided it best to name its freshest e-reader the Eee Tablet, while its downright magical tablet goes by Eee Pad. Got all that? Good. The Eee Tablet (again, not to be confused with the Eee Pad tablet) is half e-reader, half note taker, and it's an interesting twist on a played product category. We took a few precious minutes to experiment with the device here on the Computex show floor, and overall, we like what we're seeing. Gone is the painfully slow E-Ink page refresh that Kindle owners are so accustomed to, with this particular LCD proving deliciously quick at changing screens. The only hang-up comes when you attempt to flip through too many pages, too fast -- we managed to harness a loading wheel on two occasions, both of which took around six or eight seconds to vanish and the next page to finally appear. We also confirmed that the screen only works with the included stylus, much like pen-enabled Wacom tablets. That said, the bundled stylus was perfectly weighted, and the Eee Tablet responded well to our doodling. Speaking of weight, the model shown here in Taipei was shockingly heavy (at least iPad-level heavy), while the 10-inch EP101TC was markedly less hefty. Enough chatter -- have a look at our hands-on video just past the break.
ASUS Eee Pad EP101TC and EP121 preview
ASUS Eee Pad EP101TC and EP121 preview: 
At long last, the ASUS Eee Pads have arrived, but unfortunately they're just not working the way we've been imagining for all these months. We got a few minutes to toy around with the 10-inch EP101TC and 12-inch EP121, but both were barely working. And 'barely' is being gracious. We can tell you that both models are incredibly well built -- they've got aluminum edges and matte back covers -- and neither was particularly heavy. The EP121 wasn't booting at all, but it was being shown off with a super sleek keyboard docking station, which will be used to turn the tablet into an ultraportable laptop of sorts. An NVIDIA Tegra-powered EP101TC was powering on, but its Windows Embedded Compact 7-based interface was still noticeably buggy, and the touchscreen quite unresponsive. The UI certainly looked attractive enough, and our swipe motions across the capacitive touchscreen were handled admirably, but ASUS definitely has a ways to go in terms of functionality. We wish we had more impressions to share, but it looks as if we'll have to wait for a less half-baked iteration to really dive in. 'Til then, feel free to peruse the gallery below and peek the video just beyond the break.
At long last, the ASUS Eee Pads have arrived, but unfortunately they're just not working the way we've been imagining for all these months. We got a few minutes to toy around with the 10-inch EP101TC and 12-inch EP121, but both were barely working. And 'barely' is being gracious. We can tell you that both models are incredibly well built -- they've got aluminum edges and matte back covers -- and neither was particularly heavy. The EP121 wasn't booting at all, but it was being shown off with a super sleek keyboard docking station, which will be used to turn the tablet into an ultraportable laptop of sorts. An NVIDIA Tegra-powered EP101TC was powering on, but its Windows Embedded Compact 7-based interface was still noticeably buggy, and the touchscreen quite unresponsive. The UI certainly looked attractive enough, and our swipe motions across the capacitive touchscreen were handled admirably, but ASUS definitely has a ways to go in terms of functionality. We wish we had more impressions to share, but it looks as if we'll have to wait for a less half-baked iteration to really dive in. 'Til then, feel free to peruse the gallery below and peek the video just beyond the break.
28. maj 2010
HD 101: Overscan and why all TVs do it
HD 101: Overscan and why all TVs do it:
The concept of overscan seems particularly difficult for geeks to comprehend -- normal people usually don't care to even understand it -- and some even get down right confrontational when they first learn that all TVs do it. But the fact is that even the latest LCDs and plasmas don't show all 2 million pixels of a 1080p signal out of the box. Instead about 3 percent of 'em are cropped off the edges (as illustrated by the red line in the image above) and the remaining pixels are scaled to fill in all the pixels of your HDTV. The real kick in the head is that the reason isn't a good one, especially when you consider the advanced technology that's available today. So in this HD 101 we're going to cover what overscan is, why it's there, and finally how to 'fix' it.
Other HD 101 goodness:
What is ATSC, PSIP, QAM, and 8-VSB?
How to use Dolby TrueHD and DTS-HD with your PS3
Why there are black bars on HDTVs
Continue reading HD 101: Overscan and why all TVs do it
27. maj 2010
Quick Tip: Pure CSS Text Gradients
Quick Tip: Pure CSS Text Gradients: "

With the latest advancements in CSS, we now have access to powerful styling techniques, including box shadows, rounded corners, background gradients, etc. However, we don’t currently have the ability to apply gradients to the text itself. Luckily, with a bit of trickery, we can force this effect — at least in webkit browsers! I’ll show you how in today’s video quick tip.
4 Minutes: Video Tutorial
Subscribe to our YouTube page to watch all of the video tutorials!
Prefer to watch this video on Screenr?
Final Code
<!DOCTYPE html>

<html lang="en">
<head>
 <meta charset="utf-8">
 <title>Text Gradients</title>
 <link href='http://fonts.googleapis.com/css?family=Lobster' rel='stylesheet' type='text/css'>

 <style>
 body {
  background: #292929;
  padding: 1em;
 }

 h1 {
  position: relative;
  font-size: 70px;
  margin-top: 0;
  font-family: 'Lobster', helvetica, arial;
 }

 h1 a {
  text-decoration: none;
  color: #666;
  position: absolute;

  -webkit-mask-image: -webkit-gradient(linear, left top, left bottom, from(rgba(0,0,0,1)), color-stop(50%, rgba(0,0,0,.5)), to(rgba(0,0,0,1)));
 }

 h1:after {
  content : 'Hello World';
  color: #d6d6d6;
  text-shadow: 0 1px 0 white;
 }

 </style>
</head>
<body>
    <h1> <a href="#"> Hello World </a> </h1>
</body>
</html>
I originally learned this technique from the guys over at NiceWebType.com. Be sure to visit their website to learn more! So what do you think?
CSS DIY Organization
CSS DIY Organization: "
Introduction: Why Bother?


 "
"
I detest looking at code or mark-up that I’ve written in the past, which I don’t understand right off the bat. I’m surely no different from you in that I want to be able to come back years later, pick the code up, and understand exactly what is going on. I don’t want to dissect the simplest concepts, where the brackets are located, or even how the mark-up is indented. I have created habits to help me with rapid development, which have kept my sanity somewhat intact. I will be honest though, I have never given much thought to how I write and organize my CSS until recently, and that is what I am sharing today.
Introduction: Why Bother?
There are plenty of ways to do what I am suggesting with CSS. Let me be the first to say, don’t use anything that I am writing about today if your comfort level is not high with my concepts. Instead, think about the concepts, and improve on the solutions I am writing about. Share your own insights. I won’t argue with you if you think there is a better way to organize style sheets, as in the end there is no right or wrong way. However, I believe the more structure you add, the better off you are in the end when working with CSS.
“How easy is it for us, as developers, to rapidly find, understand, repair or add-on to a given code base? The easier that task is, the better the internal usability.”
There are a couple of concepts that I want to cover now in general to get the brain juices working. First, there is a concentration on usability with web development. We want the users of our websites to find things quicker, navigate more naturally, and overall intrinsically understand the concepts of our applications. That’s a very worthy use of time and energy. What is sometimes forgotten is the internal usability in all of the planning and discussions for our projects. How easy is it for us as developers, to rapidly find, understand, repair or add-on to a given code base? The easier that task is, the better the internal usability. In my opinion, that concept is as worthy of our time and thought as the front end usability.
Second, remember there is a C in CSS. It’s the cascading part. The method I use might fly in the face of some conventional thoughts, but when you back yourself into a corner for only using a certain aspects of CSS, you lose out on the power. When I am planning a large project, I think of the id selectors as “explain the entity”, class selectors as “describe the entity” and style attributes as “override what I just said”. I cascade the properties down to lessen the code, and give a little method to the madness. Again, there are no right or wrong ways, but when you have no plan, you are setting yourself up for a lot of extra work, not to mention extra overhead.
Finally, remember there are always tradeoffs in development. The most elegant ways of doing things aren’t always the most efficient.
Sometimes, the most efficient ways of doing things cost you down the road when you have to pick the code back up for support.
No one can make these choices for you, but you need to consider the tradeoffs while you write. Sometimes you have to bite the bullet just a little bit, perhaps to add an additional HTTP request to make the end result internally usable. Other times, you need to add a good comment to remind yourself of the choice that you made, and move on.
A Couple of Choices: Frameworks or The Wild West
Chances are, you are using either a framework to handle your CSS or you are adding your styles in a manner that you have grown accustomed to, but without much of a structure. Both have there upsides and downsides. Let’s look at a few CSS frameworks first, from the horse’s mouths:
Blue Print
YUI 2
Baseline
YAML
There are a numerous more, and just like a frameworks for your server side language of choice, each have their advantages over one another, and each have their drawbacks. I am not here to steer you away from a framework, as I have used them in the past and I believe in the concepts. I think when you are working on a large team, there is no better choice as it standardizes your styles and it lessons the voice of the individual developer and designer. That said, I do believe there are some drawbacks from using a CSS framework, as it adds to the overhead particularly with styles you aren’t using, and the learning curve is rather high. This can be a bit frustrating particularly with projects that have strict schedules. That said, the learning curve is just that, a curve, and over time you will master whichever project you deem best. The advantage of using a framework is that you now have improved your internal usability, as you are using a set method paradigm, although that method is something that is most likely outside of your control.
Wild West
The other solution is what I call the “Wild West” where anything goes. I’ll be honest and say there are many times I have just pushed something out the door without much thought to the future, or in the case of a very small project where the CSS is not very substantial. The learning curve here isn’t so bad, because you are writing your CSS as you go. You have complete control over your style’s destiny. Pretty cool so far! The problem is the internal usability. Come back to that project after it is no longer fresh in your mind, and there will be some problems. “Why the heck did I write this like this” or “I have no idea what I meant by this comment” or “Why is that input not changing styles” or “what is this big chunk of chum controlling” are common responses after the style sheet is no longer fresh in your mind.
My Choice: The Hybrid Solution
If I could put the framework solution on a sliding scale with the wild west solution on the other end, I think I would prefer something just in the middle. While one bed is too hard, and the other bed is too soft, I want to find the bed that is just right. That’s what I call the hybrid solution. It shares traits with both the wild west and frameworks. On the one hand, I have control over my styles, and with that the learning curve is rather low. On the other, I want to give a little structure to what I write, so that when I come back to it later, I have at least a familiarity of the structure because I build onto my methods which each project.
It’s a bit of a DIY project like in home improvement. You are trading the structure and cost of a professional for the convenience and familiarity of using your own hands to do the work. What you hope for in the end is the same finished project, but one without the learning curve or foreign ideas and concepts from the industrial strength version.
File Naming Convention
Thinking back on the choices that we have to make as developers, I make the choice of increasing the HTTP requests for a little better organization. I know I am costing myself a little bit of performance but what I get in the end is CSS that is easier to understand when I have to look at them next. You may make a different choice here, and you won’t get much argument from me. I just prefer smaller file sizes organized in a consistent manner over the one large CSS file or header in my HTML.
Here’s what works for me:
reset.css : A reset css is one that sets all or at least of the majority of browser styles to nullify. I use a reset css so that I can battle some differences with browsers, and I see the value when dealing with cross browser issues. It’s not Nirvana, and there are some that prefer no reset, or what I recently read, a soft reset. I prefer to reset everything, and I use the Eric Meyer flavor of resets.
forms.css: I segregate my form styles from the rest of my CSS. I want to know when I am working on forms, and they aren’t quite appearing as I wish exactly where to go.
global.css: My global css file is something that I use for each larger project that I write. What is contained in this small file are small classes which I might use over and over again in projects. My rule of thumb is, if there is a shortcut for the property, then it probably doesn’t belong in the global file. I wouldn’t use the font property. For instance:
/* Colors */
.red {
   color: red;
   background: inherit;
}

.blue {
   color: blue;
   background: inherit;
}

.highlight {
   color: black;
   background: yellow;
}

/* Lists */
.horizontal {
   list-style-type: none;
   display: inline;
}

.vertical {
   list-style-type: none;
   display: block;
}

/* Text */
.small {
   font-size: small;
}

.large {
   font-size: large;
}

.bold {
   font-weight: bold;
}
Notice that these are very specific classes, that add to the cascading rules of styles. While none generally will be used as the only style for an element, they add to the description of the element that they class is applied.
style.css: My style.css is my main controller of my style. If you think in terms of OO for CSS, my style.css is my class, while the other files extend my class (somewhat anyway) and add to the inheritance of my main objects. I use my style.css to import my other files, and to define my local, project only, id selectors and classes.
ID and Class Selectors: Think a Little Differently
My hybrid method diverges here from most people, as my general rule with ids is merely to explain the element in question. ID Selectors are only used once per page (including GET processes), so I want these to be very specific in nature. In order to really maximize the reuse of code, any property outside of that explanation of an element, I really would prefer to use a class selector. Since this ID is unique to the page, I only want to use unique explanations for this selector.
For instance, my width would be somewhat unique. My padding and margin would be somewhat unique. My position would be somewhat unique. You could argue that the display for this selector would be somewhat unique. My color for the element; not really unique. My background, again not really unique. For the not really unique items, I think of these as “describe the element” for which I use class selectors.
Let’s illustrate this with a little code. For ease, I am using a recent tutorial by Jeffrey Way titled Quick Tip: Practical CSS Shapes. What if we took the original CSS:
#container {
 background: #666;
 margin: auto;
 width: 500px;
 height: 700px;
 padding-top: 30px;
 font-family: helvetica, arial, sans-serif;
 }

h1 {
  background: #e3e3e3;
  background: -moz-linear-gradient(top, #e3e3e3, #c8c8c8);
  background: -webkit-gradient(linear, left top, left bottom, from(#e3e3e3), to(#c8c8c8));
  padding: 10px 20px;
  margin-left: -20px;
  margin-top: 0;
  position: relative;
  width: 70%;
  -moz-box-shadow: 1px 1px 3px #292929;
  -webkit-box-shadow: 1px 1px 3px #292929;
    box-shadow: 1px 1px 3px #292929;
  color: #454545;
  text-shadow: 0 1px 0 white;
}
and transformed to this:
#container {
 margin: auto;
 width: 500px;
 height: 700px;
 padding-top: 30px;
 font-family: helvetica, arial, sans-serif;
 }

#heading-one {
  padding: 10px 20px;
  margin-left: -20px;
  margin-top: 0;
  position: relative;
  width: 70%;
}

.norm-background {
       color: #fff;
       background: #666;
}

.heading-fancy {
  background: #e3e3e3;
  background: -moz-linear-gradient(top, #e3e3e3, #c8c8c8);
  background: -webkit-gradient(linear, left top, left bottom, from(#e3e3e3), to(#c8c8c8));
  -moz-box-shadow: 1px 1px 3px #292929;
  -webkit-box-shadow: 1px 1px 3px #292929;
  color: #454545;
  text-shadow: 0 1px 0 white;
}
So far, all I have really done is added two new classes from the unique h1 selector and abstracted that h1 out to a unique ID. I haven’t gained anything for the moment, and in actuality I have added just a whee bit more overhead to my file. Where’s the advantage then?
If you think for a moment that you might reuse these descriptions somewhere else, perhaps for a sub-heading, then we have some code reuse. Let’s look to see what we can do now. Here’s how it originally looks:
and here is how it looks with a sub-heading:
I only added a new definition now:
#heading-two {
  padding: 10px 20px;
  margin-left: -20px;
  margin-top: 0;
  position: relative;
  width: 30%;
}
Along with a little HTML:
   <h1 id="heading-one" class="heading-fancy"> My Heading <span class="arrow"></span> </h1>
   <h2 id="heading-two" class="heading-fancy small"> My Sub-Heading <span class="arrow"></span> </h2>
We have code reuse, and we have a method which is consistent. If you take this method and apply it, you will reduce the number of styles (or objects if you prefer) that you write. Less code with a method means easier support at a later date. Really, nothing earth shattering here, but when you begin to explain your ID selectors but describe your classes it’s an easy method to add a little sanity to your code.
Style Attributes
I’m sure someone, somewhere, has told you to never use the style attribute. I am also sure that some of you will disagree with me, and that’s OK, I can take it. I am going to break that rule just a bit with a caveat. Never use it without a little thought to what you are doing. There are legitimate uses for the style attribute, particularly when working with complex applications using AJAX calls, but those uses come from your behavior layer.
When you should use the style attribute, is when you need to make a quick final call to override something in the cascade display for the element which wouldn’t make sense to add to your global.css file. For instance, you might need to override a style from your behavior layer based on an user action. It does add to the complexity just a bit, but it adds to the cascade. I wouldn’t use multiple properties, as this is a quick override, or rather, “forget what I just told you, do this instead”. It’s a cascade, and you should treat your CSS as such, in my opinion.
Indentation, Layout and Comments
We spend a lot of time putting emphasis on our indentation in our code and HTML, but I don’t often see the same emphasis in our CSS. It makes the world of difference. Let’s take our working example again:
<div id="container" class="norm-background">
   <h1 id="heading-one" class="heading-fancy"> My Heading <span class="arrow"></span> </h1>
   <h2 id="heading-two" class="heading-fancy small"> My Sub-Heading <span class="arrow"></span> </h2>
</div>
If we indent that in our markup, why not indent it the same way in our CSS:
#container {
 margin: auto;
 width: 500px;
 height: 700px;
 padding-top: 30px;
 font-family: helvetica, arial, sans-serif;
 }

   #heading-one {
        padding: 10px 20px;
        margin-left: -20px;
        margin-top: 0;
        position: relative;
        width: 70%;
   }

   #heading-two {
        padding: 10px 20px;
        margin-left: -20px;
        margin-top: 0;
        position: relative;
        width: 30%;
   }
It adds just a little more emphasis as to what is going on with these ID selectors. I understand now that they are children to the container div without comparing my mark-up.
When deciding on the layout of your style file, this is the rule of thumb that I use. You have to @import your additional CSS files first starting with the reset.css file, and then the rest. Define your elements next such as h1, anchors, etc. Next, define your ID selectors in your style.css. If you are working with multiple pages, comment the start of each new page within your indentation. For instance, #container is probably an element of the layout which is the container for each page, so start there with your indentation and work out commenting where you are using each element. Finally, define your classes. I don’t normally indent my classes, due to the fact that they are often reused, and the indentation doesn’t show where they are used.
Finally, and probably most importantly, comment your CSS just as you would your server side code. If there is any context that you can give to a class, such as elements that it is used, or ID that it matches, comment it. Any context that you give your future self is like having a time machine. Marty McFly might not have knocked that creepy guy out of the way of oncoming traffic if he had just read the Flux Capacitor comments first.
Conclusion
I am relatively sure my methods will not have a new dance move named after it, nor will it cure cancer. I am not even sure if they would be adapted by a single person outside of my immediate family. That said, I really hope you take the concepts away from this and build methods that work for you. Development usability is a goal that we should all be striving to achieve. When you create a methodology, you increase your internal usability exponentially as you are developing habits which you reuse and share with your team and others. It fixes development problems, increases productivity, and decreases the overall cost of development. It is one of those rare win / win propositions that you encounter in your daily development life.
Thanks for reading, and please share your ideas.
Why you Should be using PHP’s PDO for Database Access
Why you Should be using PHP’s PDO for Database Access:
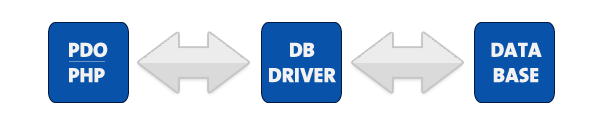


Many PHP programmers learned how to access databases by using either the mysql or mysqli extensions. Since PHP 5.1, there’s been a better way. PHP Data Objects (PDO) provide methods for prepared statements and working with objects that will make you far more productive!
PDO Introduction
“PDO – PHP Data Objects – is a database access layer providing a uniform method of access to multiple databases.”
It doesn’t account for database-specific syntax, but can allow for the process of switching databases and platforms to be fairly painless, simply by switching the connection string in many instances.
This tutorial isn’t meant to be a complete how-to on SQL. It’s written primarily for people currently using the mysql or mysqli extension to help them make the jump to the more portable and powerful PDO.
Database Support
The extension can support any database that a PDO driver has been written for. At the time of this writing, the following database drivers are available:
- PDO_DBLIB ( FreeTDS / Microsoft SQL Server / Sybase )
- PDO_FIREBIRD ( Firebird/Interbase 6 )
- PDO_IBM ( IBM DB2 )
- PDO_INFORMIX ( IBM Informix Dynamic Server )
- PDO_MYSQL ( MySQL 3.x/4.x/5.x )
- PDO_OCI ( Oracle Call Interface )
- PDO_ODBC ( ODBC v3 (IBM DB2, unixODBC and win32 ODBC) )
- PDO_PGSQL ( PostgreSQL )
- PDO_SQLITE ( SQLite 3 and SQLite 2 )
- PDO_4D ( 4D )
All of these drivers are not necessarily available on your system; here’s a quick way to find out which drivers you have:
print_r(PDO::getAvailableDrivers());
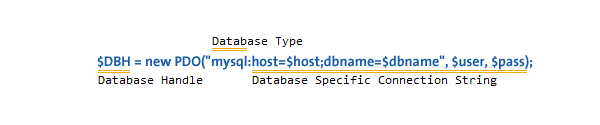
Connecting
Different databases may have slightly different connection methods. Below, the method to connect to some of the most popular databases are shown. You’ll notice that the first three are identical, other then the database type – and then SQLite has its own syntax.
try {
 # MS SQL Server and Sybase with PDO_DBLIB
 $DBH = new PDO("mssql:host=$host;dbname=$dbname, $user, $pass");
 $DBH = new PDO("sybase:host=$host;dbname=$dbname, $user, $pass");

 # MySQL with PDO_MYSQL
 $DBH = new PDO("mysql:host=$host;dbname=$dbname", $user, $pass);

 # SQLite Database
 $DBH = new PDO("sqlite:my/database/path/database.db");
}
catch(PDOException $e) {
   echo $e->getMessage();
}
Please take note of the try/catch block – you should always wrap your PDO operations in a try/catch, and use the exception mechanism – more on this shortly. Typically you’re only going to make a single connection – there are several listed to show you the syntax. $DBH stands for ‘database handle’ and will be used throughout this tutorial.
You can close any connection by setting the handle to null.
# close the connection
$DBH = null;
You can get more information on database specific options and/or connection strings for other databases from PHP.net.
Exceptions and PDO
PDO can use exceptions to handle errors, which means anything you do with PDO should be wrapped in a try/catch block. You can force PDO into one of three error modes by setting the error mode attribute on your newly created database handle. Here’s the syntax:
$DBH->setAttribute( PDO::ATTR_ERRMODE, PDO::ERRMODE_SILENT );
$DBH->setAttribute( PDO::ATTR_ERRMODE, PDO::ERRMODE_WARNING );
$DBH->setAttribute( PDO::ATTR_ERRMODE, PDO::ERRMODE_EXCEPTION );
No matter what error mode you set, an error connecting will always produce an exception, and creating a connection should always be contained in a try/catch block.
PDO::ERRMODE_SILENT
This is the default error mode. If you leave it in this mode, you’ll have to check for errors in the way you’re probably used to if you used the mysql or mysqli extensions. The other two methods are more ideal for DRY programming.
PDO::ERRMODE_WARNING
This mode will issue a standard PHP warning, and allow the program to continue execution. It’s useful for debugging.
PDO::ERRMODE_EXCEPTION
This is the mode you should want in most situations. It fires an exception, allowing you to handle errors gracefully and hide data that might help someone exploit your system. Here’s an example of taking advantage of exceptions:
# connect to the database
try {
 $DBH = new PDO("mysql:host=$host;dbname=$dbname", $user, $pass);
 $DBH->setAttribute( PDO::ATTR_ERRMODE, PDO::ERRMODE_EXCEPTION );

 # UH-OH! Typed DELECT instead of SELECT!
 $DBH->prepare('DELECT name FROM people');
}
catch(PDOException $e) {
   echo "I'm sorry, Dave. I'm afraid I can't do that.";
   file_put_contents('PDOErrors.txt', $e->getMessage(), FILE_APPEND);
}
There’s an intentional error in the select statement; this will cause an exception. The exception sends the details of the error to a log file, and displays a friendly (or not so friendly) message to the user.
Insert and Update
Inserting new data, or updating existing data is one of the more common database operations. Using PDO, this is normally a two-step process. Everything covered in this section applies equally to both UPDATE and INSERT operations.
Here’s an example of the most basic type of insert:
# STH means "Statement Handle"
$STH = $DBH->prepare("INSERT INTO folks ( first_name ) values ( 'Cathy' )");
$STH->execute();
You could also accomplish the same operation by using the exec() method, with one less call. In most situations, you’re going to use the longer method so you can take advantage of prepared statements. Even if you’re only going to use it once, using prepared statements will help protect you from SQL injection attacks.
Prepared Statements
Using prepared statements will help protect you from SQL injection.
A prepared statement is a precompiled SQL statement that can be executed multiple times by sending just the data to the server. It has the added advantage of automatically making the data used in the placeholders safe from SQL injection attacks.
You use a prepared statement by including placeholders in your SQL. Here’s three examples: one without placeholders, one with unnamed placeholders, and one with named placeholders.
# no placeholders - ripe for SQL Injection!
$STH = $DBH->("INSERT INTO folks (name, addr, city) values ($name, $addr, $city)");

# unnamed placeholders
$STH = $DBH->("INSERT INTO folks (name, addr, city) values (?, ?, ?);

# named placeholders
$STH = $DBH->("INSERT INTO folks (name, addr, city) value (:name, :addr, :city)");
You want to avoid the first method; it’s here for comparison. The choice of using named or unnamed placeholders will affect how you set data for those statements.
Unnamed Placeholders
# assign variables to each place holder, indexed 1-3
$STH->bindParam(1, $name);
$STH->bindParam(2, $addr);
$STH->bindParam(3, $city);

# insert one row
$name = "Daniel"
$addr = "1 Wicked Way";
$city = "Arlington Heights";
$STH->execute();

# insert another row with different values
$name = "Steve"
$addr = "5 Circle Drive";
$city = "Schaumburg";
$STH->execute();
There are two steps here. First, we assign variables to the various placeholders (lines 2-4). Then, we assign values to those placeholders and execute the statement. To send another set of data, just change the values of those variables and execute the statement again.
Does this seem a bit unwieldy for statements with a lot of parameters? It is. However, if your data is stored in an array, there’s an easy shortcut:
# the data we want to insert
$data = array('Cathy', '9 Dark and Twisty Road', 'Cardiff');

$STH = $DBH->("INSERT INTO folks (name, addr, city) values (?, ?, ?);
$STH->execute($data);
That’s easy!
The data in the array applies to the placeholders in order. $data[0] goes into the first placeholder, $data[1] the second, etc. However, if your array indexes are not in order, this won’t work properly, and you’ll need to re-index the array.
Named Placeholders
You could probably guess the syntax, but here’s an example:
# the first argument is the named placeholder name - notice named
# placeholders always start with a colon.
$STH->bindParam(':name', $name);
You can use a shortcut here as well, but it works with associative arrays. Here’s an example:
# the data we want to insert
$data = array( 'name' => 'Cathy', 'addr' => '9 Dark and Twisty', 'city' => 'Cardiff' );

# the shortcut!
$STH = $DBH->("INSERT INTO folks (name, addr, city) value (:name, :addr, :city)");
$STH->execute($data);
The keys of your array do not need to start with a colon, but otherwise need to match the named placeholders. If you have an array of arrays you can iterate over them, and simply call the execute with each array of data.
Another nice feature of named placeholders is the ability to insert objects directly into your database, assuming the properties match the named fields. Here’s an example object, and how you’d perform your insert:
# a simple object
class person {
   public $name;
   public $addr;
   public $city;

   function __construct($n,$a,$c) {
       $this->name = $n;
       $this->addr = $a;
       $this->city = $c;
   }
   # etc ...
}

$cathy = new person('Cathy','9 Dark and Twisty','Cardiff');

# here's the fun part:
$STH = $DBH->("INSERT INTO folks (name, addr, city) value (:name, :addr, :city)");
$STH->execute((array)$cathy);
By casting the object to an array in the execute, the properties are treated as array keys.
Selecting Data
Data is obtained via the ->fetch(), a method of your statement handle. Before calling fetch, it’s best to tell PDO how you’d like the data to be fetched. You have the following options:
- PDO::FETCH_ASSOC: returns an array indexed by column name
- PDO::FETCH_BOTH (default): returns an array indexed by both column name and number
- PDO::FETCH_BOUND: Assigns the values of your columns to the variables set with the ->bindColumn() method
- PDO::FETCH_CLASS: Assigns the values of your columns to properties of the named class. It will create the properties if matching properties do not exist
- PDO::FETCH_INTO: Updates an existing instance of the named class
- PDO::FETCH_LAZY: Combines PDO::FETCH_BOTH/PDO::FETCH_OBJ, creating the object variable names as they are used
- PDO::FETCH_NUM: returns an array indexed by column number
- PDO::FETCH_OBJ: returns an anonymous object with property names that correspond to the column names
In reality, there are three which will cover most situations: FETCH_ASSOC, FETCH_CLASS, and FETCH_OBJ. In order to set the fetch method, the following syntax is used:
$STH->setFetchMode(PDO::FETCH_ASSOC);
You can also set the fetch type directly within the ->fetch() method call.
FETCH_ASSOC
This fetch type creates an associative array, indexed by column name. This should be quite familiar to anyone who has used the mysql/mysqli extensions. Here’s an example of selecting data with this method:
# using the shortcut ->query() method here since there are no variable
# values in the select statement.
$STH = $DBH->query('SELECT name, addr, city from folks');

# setting the fetch mode
$STH->setFetchMode(PDO::FETCH_ASSOC);

while($row = $STH->fetch()) {
   echo $row['name'] . "\n";
   echo $row['addr'] . "\n";
   echo $row['city'] . "\n";
}
The while loop will continue to go through the result set one row at a time until complete.
FETCH_OBJ
This fetch type creates an object of std class for each row of fetched data. Here’s an example:
# creating the statement
$STH = $DBH->query('SELECT name, addr, city from folks');

# setting the fetch mode
$STH->setFetchMode(PDO::FETCH_OBJ);

# showing the results
while($row = $STH->fetch()) {
   echo $row->name . "\n";
   echo $row->addr . "\n";
   echo $row->city . "\n";
}
FETCH_CLASS
The properties of your object are set BEFORE the constructor is called. This is important.
This fetch method allows you to fetch data directly into a class of your choosing. When you use FETCH_CLASS, the properties of your object are set BEFORE the constructor is called. Read that again, it’s important. If properties matching the column names don’t exist, those properties will be created (as public) for you.
This means if your data needs any transformation after it comes out of the database, it can be done automatically by your object as each object is created.
As an example, imagine a situation where the address needs to be partially obscured for each record. We could do this by operating on that property in the constructor. Here’s an example:
class secret_person {
   public $name;
   public $addr;
   public $city;
   public $other_data;

   function __construct($other = '') {
       $this->address = preg_replace('/[a-z]/', 'x', $this->address);
       $this->other_data = $other;
   }
}
As data is fetched into this class, the address has all its lowercase a-z letters replaced by the letter x. Now, using the class and having that data transform occur is completely transparent:
$STH = $DBH->query('SELECT name, addr, city from folks');
$STH->setFetchMode(PDO::FETCH_CLASS, 'secret_person');

while($obj = $STH->fetch()) {
   echo $obj->addr;
}
If the address was ‘5 Rosebud,’ you’d see ‘5 Rxxxxxx’ as your output. Of course, there may be situations where you want the constructor called before the data is assigned. PDO has you covered for this, too.
$STH->setFetchMode(PDO::FETCH_CLASS | PDO::FETCH_PROPS_LATE, 'secret_person');
Now, when you repeat the previous example with this fetch mode (PDO::FETCH_PROPS_LATE) the address will NOT be obscured, since the constructor was called and the properties were assigned.
Finally, if you really need to, you can pass arguments to the constructor when fetching data into objects with PDO:
$STH->setFetchMode(PDO::FETCH_CLASS, 'secret_person', array('stuff'));
If you need to pass different data to the constructor for each object, you can set the fetch mode inside the fetch method:
$i = 0;
while($rowObj =  $STH->fetch(PDO::FETCH_CLASS, 'secret_person', array($i))) {
   // do stuff
   $i++
}
Some Other Helpful Methods
While this isn’t meant to cover everything in PDO (it’s a huge extension!) there are a few more methods you’ll want to know in order to do basic things with PDO.
$DBH->lastInsertId();
The ->lastInsertId() method is always called on the database handle, not statement handle, and will return the auto incremented id of the last inserted row by that connection.
$DBH->exec('DELETE FROM folks WHERE 1');
$DBH->exec("SET time_zone = '-8:00'");
The ->exec() method is used for operations that can not return data other then the affected rows. The above are two examples of using the exec method.
$safe = $DBH->quote($unsafe);
The ->quote() method quotes strings so they are safe to use in queries. This is your fallback if you’re not using prepared statements.
$rows_affected = $STH->rowCount();
The ->rowCount() method returns an integer indicating the number of rows affected by an update, insert or delete – it does not work with select. To get the number of rows from a select you’d have to do the following:
$sql = "SELECT COUNT(*) FROM folks";
if ($STH = $DBH->query($sql)) {
   # check the row count
   if ($STH->fetchColumn() > 0) {

   # issue a real select here, because there's data!
   }
   else {
       echo "No rows matched the query.";
   }
}
Conclusion
I hope this helps some of you migrate away from the mysql and mysqli extensions. What do you think? Are there any of you out there who might make the switch?
16. maj 2010
Easy Graphs with Google Chart Tools
Easy Graphs with Google Chart Tools:

Google Chart Tools provide several ways to easily add charts to any web page. Charts may be static or interactive, and in this tutorial, we’ll learn how to use both of them.
Static vs Interactive Charts
There are two different types of graphs that Chart Tools can generate: image charts (static graphs) and interactive charts.
- Image Charts.- Use the Google Chart API.
- Interactive Charts.- Use the Google Visualization API.
Image Charts are quite easy to use, however, interactive charts are far more flexible, because they can trigger events which we can use to interact with other elements in the page.
First, The Super-Easy Way
Yes, there is a super-easy way to include a chart in your page – as easy as writing a URL like this:
http://chart.apis.google.com/chart?cht=p3&chs=450x200&chd=t:2,4,3,1&chl=Phones|Computers|Services|Other&chtt=Company%20Sales&chco=ff0000
if you copy and paste this url in your browser, you’ll see the following:
You can place the image anywhere in your page using the URL as the src attribute of an image tag:
<img src='http://chart.apis.google.com/chart?cht=p3&chs=450x200&chd=t:2,4,3,1&chl=Phones|Computers|Services|Other&chtt=Company%20Sales&chco=ff0000'>
That’s the Google Charts API. Request are sent as GET or POST URLs, and the Google charts server returns a PNG image in response. The type of chart, data and options are all specified within the querystring of the URL. The API defines how to do that. Let’s review the different options.
http://chart.apis.google.com/chart?
This is the base URL; we’ll use it for all image chart requests. The rest are parameters in the form name=value separated by &.
Mandatory Parameters
There are only three mandatory parameters: cht, chs, and chd. The rest are optional.
cht=p3
This is the chart type. We are using a 3D pie chart which is p3. You can visit the chart gallery for all available chart types.
chs=450×200
This is the chart size in pixels (width x height).
chd=t:2,4,3,1
This is the data to display in the chart. The first letter (t) indicates the data format. In this case, we are using basic text format which is a list of comma separated values.
Optional Parameters
Each chart type has a few optional parameters to configure some aspects of your graph: title, labels, font types, colors, gradients, etc. This is what we have included:
chl=Phones|Computers|Services|Other
Chart labels for each pie slice.
chtt=Company%20Sales
Chart title.
chco=ff0000
Chart color in rrggbb hexadecimal format.
If you specify one single color, the slices will have different gradations. You can also specify a gradient with two colors (chco=ff0000,00ff00) or a color for each slice (chco=ff0000|3355aa|8322c2|112233).
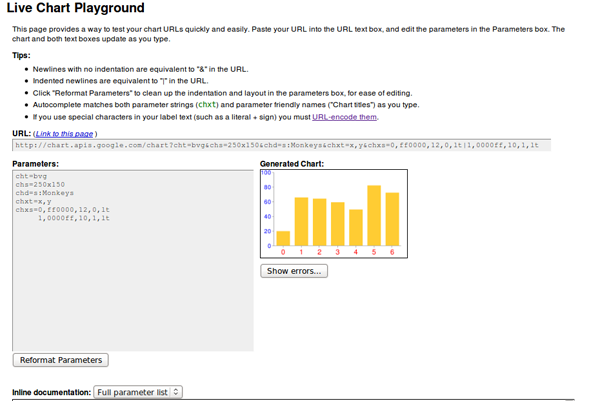
This is it for image charts. There isn’t much to it! There are a lot of different chart types available, and, if you play with the parameters, you can get some really nice results. The Google Live Chart Playground is an excellent tool to do this. You play with parameters and see the changes in the generated image – an easy way to fine-tune the url for your graph!
Interactive Charts
To include interactive charts in your web pages, you have to use a different API: the Google Visualization API. In this case, the interface is not a URL. You’ll have to use a JavaScript library, and write a few lines of code – but nothing difficult.
There is a gallery of ready-made visualizations (graphs) that you can use. You can also create and share your own graph, but the visualizations in the gallery will probably cover most of your needs for displaying data.
The level of interactivity depends on the particular visualizations you use. Usually, the graph will react in a certain way when clicked (showing a tool tip or animating), but the really powerful feature is that they can trigger events and you can register callbacks to perform any action related to that event. Examples of events can be selecting a bar or a pie slice, mouseOver, mouseOut, etc.
We’ll use local data to feed the visualizations in our examples, but you can obtain your data in any other way. A common option would be to retrieve the data from a database using AJAX. You can even use the Visualization API; it also defines a way to request and offer (for servers) data in a format which can be immediatly used in any visualization, but we won’t cover that here.
Formatting the Data
It doesn’t matter how we get our data, but all visualizations need to receive it in a DataTable object. It’s basically a table with rows and columns. Each column is defined with a particular data type (and an ID and a Label which are optional).
To reference a particular cell in the table, you use the pair (row, column). Row is always a number, starting a zero. Column can also be a zero-based number or an optional ID.
If we want to display the earnings of our company in 2009 in a column chart, we have to prepare the data in the following way:
| Quarters 2009 | Earnings |
|---|---|
| Q1 | 308 |
| Q2 | 257 |
| Q3 | 375 |
| Q4 | 123 |
Two columns: the first one (with type ’string’) is the label for each bar in the chart, and the second one (with type ‘number’) is the value for that bar. We have four rows which means well have four bars to display.
How do we put that in a DataTable object? This is the code to do so – each line is explained later:
//create data table object
var dataTable = new google.visualization.DataTable();

//define columns
dataTable.addColumn('string','Quarters 2009');
dataTable.addColumn('number', 'Earnings');

//define rows of data
dataTable.addRows([['Q1',308], ['Q2',257],['Q3',375],['Q4', 123]]);
First we create our DataTable object with:
var dataTable = new google.visualization.DataTable();
Then we define the two columns in our table using the method addColumn(). The first value is the type and the second value is the optional label.
dataTable.addColumn('string','Quarters 2009');
dataTable.addColumn('number', 'Earnings');
And finally, we define the data rows using the addRows() method.
dataTable.addRows([['Q1',308], ['Q2',257],['Q3',375],['Q4', 123]]);
Each row is an array, and all data is also enclosed in another array.
Rows can also be defined one row at a time:
dataTable.addRow(['Q1',308]);
or even one cell at a time:
data.setValue(0, 0, 'Q1');
Here, the first two numbers are the row and column, respectively.
This is the way to create DataTable objects. Every visualization needs to be loaded with data in this format. That doesn’t mean that the table is the same for every visualization. The particular number and type of columns and rows has to be checked in the documentation for each chart.
Visualizing our Data as a Column Chart
For this first example, we’ll use a Column Chart to present our data. In the Google Visualization Gallery, we can click any chart type to see documentation and examples.
To use any visualization, we have to load the Google AJAX API before; it provides the core functionality needed in many other google APIs.
<script type="text/javascript" src="http://www.google.com/jsapi"></script>
Now we can load the Visualization API using the google.load() function (from the AJAX API):
google.load('visualization', '1', {'packages': ['columnchart']});
The second parameter, ‘1,’ refers to the version of the API to load (‘1′ means the current version). ‘packages’ is an array with all the visualizations we are going to use. In this case, we’ll use only one: the column chart.
At this point, we have the necessary libraries to create our DataTable object and display our graph, however, we need to be sure that the visualization is completely loaded, otherwise we’ll get JavaScript errors and our graph won’t display.
The way to do this is by registering a callback. The function will be called when the visualization (API and package) is loaded.
           //set callback
           google.setOnLoadCallback (createChart);
Function createChart is where we create our data table and our chart. The final, complete code, is:
<!DOCTYPE HTML PUBLIC "-//W3C//DTD HTML 4.01//EN" "http://www.w3.org/TR/html4/strict.dtd">
<html>
   <head>
       <title>Google Charts Tutorial</title>

       <!-- load Google AJAX API -->
       <script type="text/javascript" src="http://www.google.com/jsapi"></script>
       <script type="text/javascript">
           //load the Google Visualization API and the chart
           google.load('visualization', '1', {'packages': ['columnchart']});

           //set callback
           google.setOnLoadCallback (createChart);

           //callback function
           function createChart() {

               //create data table object
               var dataTable = new google.visualization.DataTable();

               //define columns
               dataTable.addColumn('string','Quarters 2009');
               dataTable.addColumn('number', 'Earnings');

               //define rows of data
               dataTable.addRows([['Q1',308], ['Q2',257],['Q3',375],['Q4', 123]]);

               //instantiate our chart object
               var chart = new google.visualization.ColumnChart (document.getElementById('chart'));

               //define options for visualization
               var options = {width: 400, height: 240, is3D: true, title: 'Company Earnings'};

               //draw our chart
               chart.draw(dataTable, options);

           }
       </script>

   </head>

   <body>

       <!--Div for our chart -->
       <div id="chart"></div>

   </body>
</html>
The chart object is created with this line:
var chart = new google.visualization.ColumnChart (document.getElementById('chart'));
The argument is the DOM reference to the element containing the visualization. In this case, we have a <div id=”chart”></div>.
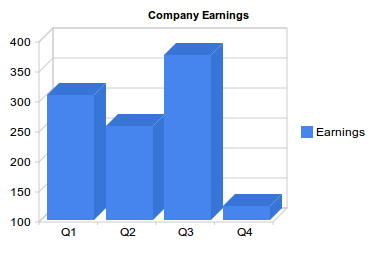
Then, we define the options we want and draw the chart:
var options = {width: 400, height: 240, is3D: true, title: 'Company Earnings'};
chart.draw(dataTable, options);
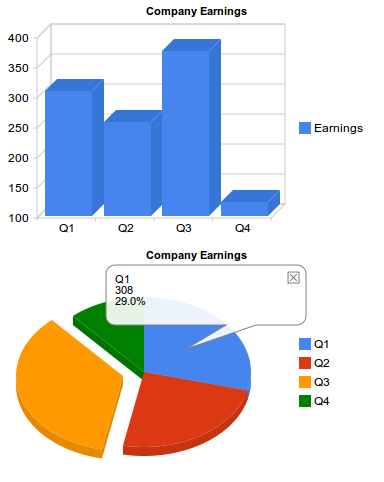
Our graph looks like this:
Note: All images here are static to make the tutorial available regardless of your browser or your JavaScript settings. Review the live demo for the interactive version.
And a Pie Chart Too
The advantage of having a clearly defined data format is that once you know how to create and populate a DataTable object, you know how to feed any visualization. You just have to check the documentation to see the particular table (number and type of columns) you have to build.
For a pie chart, we can use the exact same table we have now. Let’s add a pie chart in the same page.
We have to add our new package in the google.load() line:
google.load('visualization', '1', {'packages':['columnchart','piechart']});
and extend our createChart function with these two lines:
var secondChart = new google.visualization.PieChart (document.getElementById('secondChart'));
secondChart.draw(dataTable, options);
The complete code is:
<!DOCTYPE HTML PUBLIC "-//W3C//DTD HTML 4.01//EN" "http://www.w3.org/TR/html4/strict.dtd">
<html>
   <head>
       <title>Google Charts Tutorial</title>

       <!-- load Google AJAX API -->
       <script type="text/javascript" src="http://www.google.com/jsapi"></script>
       <script type="text/javascript">
           //load the Google Visualization API and the chart
           google.load('visualization', '1', {'packages':['columnchart','piechart']});

           //set callback
           google.setOnLoadCallback (createChart);

           //callback function
           function createChart() {

               //create data table object
               var dataTable = new google.visualization.DataTable();

               //define columns
               dataTable.addColumn('string','Quarters 2009');
               dataTable.addColumn('number', 'Earnings');

               //define rows of data
               dataTable.addRows([['Q1',308], ['Q2',257],['Q3',375],['Q4', 123]]);

               //instantiate our chart objects
               var chart = new google.visualization.ColumnChart (document.getElementById('chart'));
               var secondChart = new google.visualization.PieChart (document.getElementById('Chart2'));

               //define options for visualization
               var options = {width: 400, height: 240, is3D: true, title: 'Company Earnings'};

               //draw our chart
               chart.draw(dataTable, options);
               secondChart.draw(dataTable, options);

           }
       </script>

   </head>

   <body>

       <!--Divs for our charts -->
       <div id="chart"></div>
       <div id="Chart2"></div>

   </body>
</html>
And the generated charts:
Note: check the live demo for the interactive version.
This was easy in this case, because both visualizations used the same table columns and rows. But there are visualizations that need more columns or columns of different types, and you cannot use the data table directly. However, you can solve this by generating a different view of the original table to feed a visualization. We’ll review that shortly.
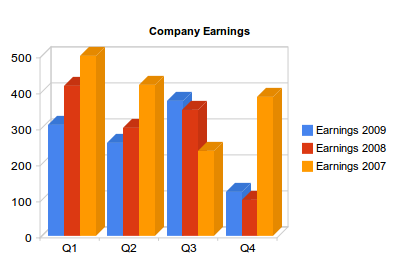
More Columns for Our Column Chart!
The data table for a column chart doesn’t have to be as simple as in the previous example. We can have bars representing the earnings for each quarter in the last three years, for example. In that case the data
table would look like so:
| Quarters | Earnings 2009 | Earnings 2008 | Earnings 2007 |
|---|---|---|---|
| Q1 | 308 | 417 | 500 |
| Q2 | 257 | 300 | 420 |
| Q3 | 375 | 350 | 235 |
| Q4 | 123 | 100 | 387 |
The only code we have to change from our first example is the DataTable object, to add two more columns and more data in each row:
//create data table object
var dataTable = new google.visualization.DataTable();

//define columns
dataTable.addColumn('string','Quarters');
dataTable.addColumn('number', 'Earnings 2009');
dataTable.addColumn('number', 'Earnings 2008');
dataTable.addColumn('number', 'Earnings 2007');

//define rows of data
dataTable.addRows([['Q1',308,417,500], ['Q2',257,300,420],['Q3',375,350,235],['Q4', 123,100,387]]);
The rest of the code does not change. The generated chart is:
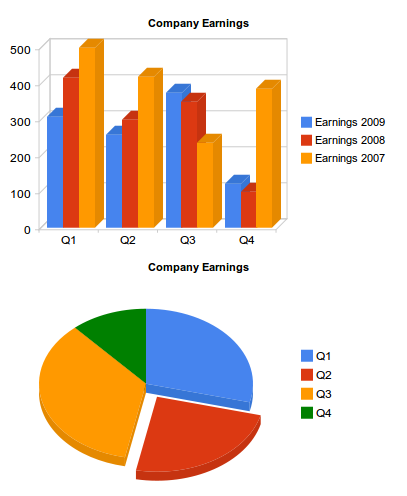
But, what if now we want to use a pie chart to represent part of this data? We cannot use the same data table as we did before, because pie charts need a two-column table (slice label and value). There is an easy way to obtain a different table from an existing DataTable object and use it to feed a chart: data Views.
Using Data Views
Views are a way to adapt our table for a different visualization. If we now want to display, in the same page, a pie chart showing the quarterly earnings distribution for last year, the table we need is only this:
| Quarters | Earnings 2009 |
|---|---|
| Q1 | 308 |
| Q2 | 257 |
| Q3 | 375 |
| Q4 | 123 |
A data view (DataView object) allows you to use only a subset of the original data. You can reorder or duplicate columns and rows or introduce columns with calculated values.
First, create the View object:
var view = new google.visualization.DataView(dataTable);
A data view is initialized with the original table and then we use the DataView methods to hide, show or filter columns or rows ( setColumns(), hideColumns(), setRows(), hideRows(), getFilteredRows, getColumnRange, etc ).
We can filter the original table to get only the first two columns (columns 0 and 1) using setColumns():
view.setColumns([0, 1]);
Now we can draw the pie chart using this view as a data table:
secondChart.draw(view, options);
Remember that we have to include the piechart package with google.load(), and we have to create the pieChart object with:
var secondChart = new google.visualization.PieChart
Now we can see both charts generated using the same data table:
Introducing Events
Events provide an easy way to connect your visualizations with other elements on your page. Visualizations can trigger some events, and you can register a listener to react to that event and perform some action. The event model is similar to the browser event model. Once again, we have to look at the documentation to check the events triggered for each visualization.
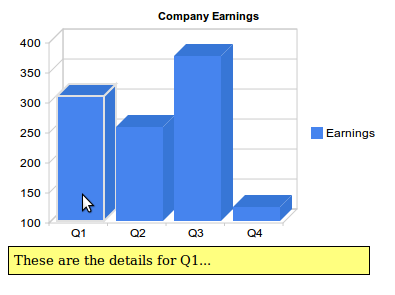
To show how events work, let’s return to our first example, the simplest column chart:
This graph triggers events on mouseover, on mouseout and on select. That means we can make it much more interactive than it is by default.
Since this graphic shows earnings for a company, it could be interesting to show a message with a brief explanation of the most important achievements or sales for each quarter when the user places the pointer over a column (onmouseover event).
Our callback will be showDetails(), and we register it for the onmouseover event:
google.visualization.events.addListener(chart, 'onmouseover', showDetails);
The first parameter is the variable that contains our chart object.
We will also need to hide the message when the pointer goes out of the column so we need another function to be called when onmouseout event triggers:
google.visualization.events.addListener(chart, 'onmouseout', hideDetails);
Within the <body> or our HTML page we have to define four divs with the messages:
   <body>

       <!--Div for our chart -->
       <div id="chart"></div>

       <!--Divs for our messages -->
       <div id="details0">These are the details for Q1...</div>
       <div id="details1">Here you have the numbers for Q2...</div>
       <div id="details2">Explanations for the third quarter...</div>
       <div id="details3">Q4 was as expected...</div>

   </body>
And then the callback functions just show or hide the corresponding message:
   function showDetails(e) {
       switch (e['row']) {
           case 0: document.getElementById('details0').style.visibility='visible';
               break;
           case 1: document.getElementById('details1').style.visibility='visible';
               break;
           case 2: document.getElementById('details2').style.visibility='visible';
               break;
           case 3: document.getElementById('details3').style.visibility='visible';
               break;
       }
   }

   function hideDetails(e) {
       switch (e['row']) {
           case 0: document.getElementById('details0').style.visibility='hidden';
               break;
           case 1: document.getElementById('details1').style.visibility='hidden';
               break;
           case 2: document.getElementById('details2').style.visibility='hidden';
               break;
           case 3: document.getElementById('details3').style.visibility='hidden';
               break;
       }
   }
Our functions accept a single parameter: the event fired. This object has all available information about the event details.
To know what bar we are over, we check the ‘row’ property of the event object. This information refers to the rows and columns of the DataTable object, but we know that row 0 corresponds to Q1, first column, and so on.
Note: Not all events pass the event object. Sometimes you have to use methods to get the information you need, read the visualization documentation to know how to get the information relative to the event fired.
The following listing include the complete code for this example. I have included a short internal CSS snippet to hide the message divs, and provide minimal formatting.
<html>
   <head>
       <title>Google Chart Tools Tutorial</title>

       <style type="text/css">

           #details0, #details1, #details2, #details3 {
               visibility:hidden;
               background: #FFFF7F;
               border: solid 1px;
               width: 350px;
               padding: 5px;
               font-size:smaller;
               position:absolute;
               top: 250px;

           }

       </style>

       <!-- load Google AJAX API -->
       <script type="text/javascript" src="http://www.google.com/jsapi"></script>
       <script type="text/javascript">
           //load thee Google Visualization API and the chart
           google.load('visualization', '1', {'packages': ['columnchart']});

           //set callback
           google.setOnLoadCallback (createChart);

           //callback function
           function createChart() {

               //create data table object
               var dataTable = new google.visualization.DataTable();

               //define columns
               dataTable.addColumn('string','Quarters 2009');
               dataTable.addColumn('number', 'Earnings');

               //define rows of data
               dataTable.addRows([['Q1',308], ['Q2',257],['Q3',375],['Q4', 123]]);

               //instantiate our chart objects
               var chart = new google.visualization.ColumnChart (document.getElementById('chart'));

               //define options for visualization
               var options = {width: 400, height: 240, is3D: true, title: 'Company Earnings'};

               //draw our chart
               chart.draw(dataTable, options);

               //register callbacks
               google.visualization.events.addListener(chart, 'onmouseover', showDetails);
               google.visualization.events.addListener(chart, 'onmouseout', hideDetails);
           }

           function showDetails(e) {
               switch (e['row']) {
                   case 0: document.getElementById('details0').style.visibility='visible';
                       break;
                   case 1: document.getElementById('details1').style.visibility='visible';
                       break;
                   case 2: document.getElementById('details2').style.visibility='visible';
                       break;
                   case 3: document.getElementById('details3').style.visibility='visible';
                       break;
               }
           }

           function hideDetails(e) {
               switch (e['row']) {
                   case 0: document.getElementById('details0').style.visibility='hidden';
                       break;
                   case 1: document.getElementById('details1').style.visibility='hidden';
                       break;
                   case 2: document.getElementById('details2').style.visibility='hidden';
                       break;
                   case 3: document.getElementById('details3').style.visibility='hidden';
                       break;
               }
           }

       </script>
   </head>

   <body>

       <!--Div for our chart -->
       <div id="chart"></div>

       <!--Divs for our messages -->
       <div id="details0">These are the details for Q1...</div>
       <div id="details1">Here you have the numbers for Q2...</div>
       <div id="details2">Explanations for the third quarter...</div>
       <div id="details3">Q4 was as expected...</div>

   </body>

</html>
And this is the result:
Once again, check the live demo to see the interactivity.
The Playground
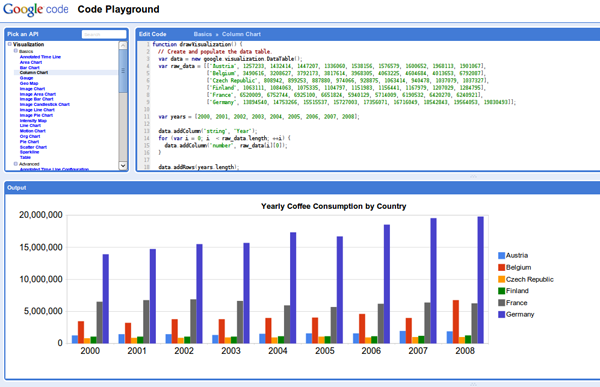
As with the static images, there is a Google Code Playground where you can play with your visualizations and parameters, and view the results:
Conclusion
Hopefully, this should be enough to get you started with Google Chart Tools. Once you get the hang of it, you’ll find that a huge level of flexibility is available to you in your web applications. Thanks for reading!
12. maj 2010
The Home Depot takes LED lighting mainstream with $20 bulbs
The Home Depot takes LED lighting mainstream with $20 bulbs: " Slowly but surely, LED light bulbs have been getting brighter and more efficient, but price has always been a major factor staying their adoption. Back in 2007, a single 308 lumen bulb cost $65, and the more things changed, the more they've stayed the same. Now, out of the blue, The Home Depot has stepped forward with a cost-effective alternative. For $20, the new EcoSmart LED bulb promises a 429 lumen, 40W equivalent with a 50,000 hour expected lifetime, making it cheaper and nearly as powerful as the 450 lumen, $40-50 design industry heavyweight GE unveiled last month. Best of all, it's already available for purchase (though backordered) at our source link. Honestly, we're starting to wonder what the catch is. PR after the break.
Slowly but surely, LED light bulbs have been getting brighter and more efficient, but price has always been a major factor staying their adoption. Back in 2007, a single 308 lumen bulb cost $65, and the more things changed, the more they've stayed the same. Now, out of the blue, The Home Depot has stepped forward with a cost-effective alternative. For $20, the new EcoSmart LED bulb promises a 429 lumen, 40W equivalent with a 50,000 hour expected lifetime, making it cheaper and nearly as powerful as the 450 lumen, $40-50 design industry heavyweight GE unveiled last month. Best of all, it's already available for purchase (though backordered) at our source link. Honestly, we're starting to wonder what the catch is. PR after the break.
11. maj 2010
kupfer - A convenient command and access tool
kupfer - A convenient command and access tool:
Kupfer is a program to change, speed up and make everything about files and programs more fun on your computer. Kupfer is heavily inspired by Quicksilver; you use it to summon an application or document quickly by typing the first parts of its name. It can also do more than getting at something quickly: there are different plugins for accessing more objects and running custom commands.
(...)
Read the rest of kupfer - A convenient command and access tool (30 words)
The State of CSS3 in Email Templates
The State of CSS3 in Email Templates: "


On the heels of some of our recent findings regarding the state of CSS in email, I reckoned it was high time to shake things up a bit. So here goes – CSS3 in email lives. Ok, so I’m sorry if I made you drop your toast, there. I know you’re thinking, “But… It’s still largely experimental… In the browser, to boot!” Yes, CSS3 support is even more fickle amongst a swag of email clients that can’t even get CSS2 right. But that doesn’t mean that it’s too soon to touch any of it.
In this article, I’ll go through two properties you can use in your email templates, alongside some practical examples. So, brush off your toast and let’s get down to business.
Let’s talk CSS2 in Email.
If you’ve been designing HTML email templates for a while now, you will know that it’s often near-impossible to predict what sort of CSS-related quirks will display when testing your design across the major email clients. For example, Gmail has been notorious for stripping any CSS that isn’t inline (and for a while, not recognizing table cellpadding & cellspacing), while some clients simply choose to do away with styles altogether.
If you’re new to designing HTML email templates, this is probably the most foreboding thing you can possibly read. But fear not, there’s lots of info out there to bring you up to speed. Give 24ways’ ‘Rock Solid HTML Emails‘ a skim and you will see that there’s no reason to crank up the zefrank. It’s manageable.
Anyway, given that designers already have enough troubles with CSS2 support in email clients, shouldn’t CSS3 be a bit of a pipe dream? Well, read on.
Is it too Early to be Using CSS3 in Email?
Yes and no. For the yes case, there’s a couple of popular email clients that have pretty robust CSS3 support (more on that later). The great news is that a fair few of the CSS3 properties that display in these clients degrade gracefully elsewhere, meaning that there’s always a fallback option. But that said, if you want to ensure that your email templates display near-consistently across the major email clients, then CSS3 is not for you.
If you swing over to our guide to CSS in email, you will see that there’s a few email clients that have partial, or full support for a number of CSS3 properties. And for the most part, they have one thing in common – Webkit.
It’s a Webkit World
How your email template looks in Outlook isn’t anything like how it will look on your Blackberry, or when you’re viewing your webmail in Firefox.
If you have the blessing of always working on a Mac, checking your email on your iPhone and passing the time by browsing on your iPad, then you have one, fairly consistent view of the web. Unfortunately, the rest of us have to do with varying degrees of CSS support across a number of vendor platforms. How your email template looks in Outlook isn’t anything like how it will look on your Blackberry, or when you’re viewing your webmail in Firefox.
So it’s probably no surprise to you that Apple devices use the same rendering engine (the software that decides how to display HTML & CSS code) across their email apps and the Safari browser. For designers, it’s probably less of a surprise that this engine is Webkit and its CSS3 support is comparatively, very good.
That said, Webkit email clients (Apple Mail, iPhone & iPad Mail) account for roughly 20% of email clients used overall. However, what really counts are the email clients your subscribers are using. For example, a Mac software developer may have close to 100% of their customers viewing their newsletter on Apple devices.
With this in mind, let’s have a look at some of the CSS3 properties that are now creeping into your inbox.
Using Text-Shadow
Usage:
<!-- x offset, y offset, blur, and color, respectively -->
<p style="text-shadow: 2px 2px 2px #000;">
  Welcome to the latest issue of Widgets Inc monthly widget gossip.
</p>
Works in:
- Apple, iPhone & iPad Mail
- Yahoo! Mail, Hotmail Live! & Gmail (when viewed in browsers other than IE)
- Android default client & Gmail
Adding drop and inner shadows with text-shadow is a non-destructive way to decorate your text. Not only can it save you from otherwise creating the same effect using an image, but it looks fine in clients where text-shadow isn’t supported.
Using Border-Radius
Usage:
<p style="border-radius: 5px; -moz-border-radius: 5px; -webkit-border-radius: 5px; border: 3px solid #000; background-color: #ccc; padding: 5px;">
  View it in a web browser.
</p>
Works in:
- Apple, iPhone & iPad Mail
- Thunderbird
- Yahoo! Mail, Hotmail Live! & Gmail (when viewed in browsers other than IE)
- Android default client
Using rounded corners on your otherwise boxy layout or square buttons is already a commonly used technique on the web. It also can give your email templates a softer, more modern look in the above email clients, plus safely reverts to square corners when not supported.
With the announcement that border-radius will be formally implemented in IE9, we can expect to see more of its use.
One Step Further: Animation and More
Some of the more extreme uses of CSS3 in email templates can be found in situations where the recipients are using a very limited set of email clients. A great example of this is the aforementioned Mac developer. Panic, the purveyors of ’shockingly good Mac software’, send amazing invoices after you purchase one of their titles, which include – gasp! – animated, glowing buttons:
Here’s the code they used to achieve this effect:
-webkit-animation-name: 'glow';
-webkit-animation-duration: .7s;
-webkit-animation-iteration-count: infinite;
-webkit-animation-direction: alternate;
-webkit-animation-timing-function: ease-in-out;
Of course, this wouldn’t look nearly as good in an email client other than Apple Mail, but it’s certainly a neat concept!
And Another Example…
How much CSS3 can you spot in this other email design from Panic? Click through for a larger version:
Take note of how the design resizes elegantly in the browser. And those airmail stripes? They’re forward slashes (/). Genius! To find out what went into this template, check out this article.
/
<b style="color: #f5290a;">/</b>
<i style="color: #006699;">/</i>
<b style="color: #f5290a;">/</b>
<i style="color: #006699;">/</i>
<b style="color: #f5290a;">/</b>
<i style="color: #006699;">/</i>
<b style="color: #f5290a;">/</b>
<i style="color: #006699;">/</i>
So, on that Note…
Take a look at CampaignMonitor’s email client usage reports, and swing over to the definitive guide to CSS in email to get an idea of which CSS3 properties are available across the major email clients. And of course, test, test, test. With a sprinkle of CSS3, a little experimentation and a dollop of caution, you can make your email template stand out from the crowd.
7 Simple and Useful Command-Line Tips
7 Simple and Useful Command-Line Tips: "
One of the most useful, but under-used, tools a web developer has is the command-line. The terminal often scares people away; so here’s where we demonstrate some of the most useful day-to-day commands.
1. The Basics
If you’re new to the command-line, you’re going to want to know a few things to help find your way around.
Changing directories
You can change to a different directory with the following:
cd ../relative/path/to/other/directory/or/file
cd /absolute/path/to/other/directory/or/file
If you get lost, you can go back to your “home” directory with the command “cd ~”.
Listing files and directories
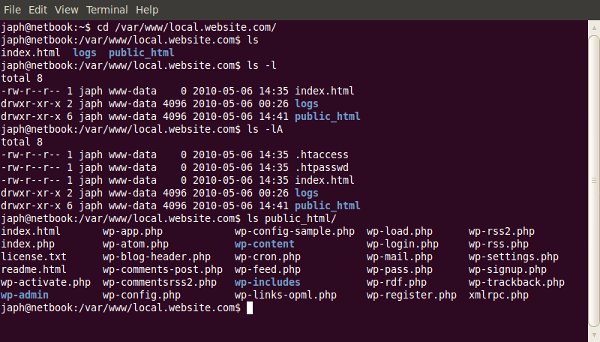
If you need to know what files a particular directory contains:
ls ../relative/path/to/other/directory/or/file
ls /absolute/path/to/other/directory/or/file
You can use the “-l” switch to show the contents as a list, and the “-A” switch to also show hidden files (on Linux based machines, files and directories whose name begins with a “.” are considered ‘hidden’).
Showing your current directory
Sometimes you just want to know what directory you’re currently in!
pwd
This will display a path to your current folder.
Copying files
Copying files from one place to another is quick and easy:
cp /files/or/directories/to/copy /directory/to/copy/to/
You can also use the “-R” switch when copying to make it recursive, so all sub-directories and files are also copied.
But typing is slow, and what if I can’t remember the exact path or command?
Most of the time, the command-line has tab-completion enabled, so you can start typing the name of a command or a file path, press tab, and it will complete it for you. If there is more than one option, it won’t complete for you but if you double-press tab, it will list the options.
Tab-completion makes typing out long file paths much faster!
How do you know what options a command has?
There are a few ways to determine what options a command has. Most commands have a –help (or -help, or -h) operator available, which lists the possible arguments and options you can use:
cd --help
If you find that the brief help given by the –help operator isn’t enough, you can read more detail with the man program:
man mysqldump
Which will tell you all about the “nano” program. Simple commands like “cd” may not have an entry in man.
2. Making a Database Backup (with GZip Compression)
Backing up your database is something you should do often. Like most things, there are a lot of ways to do this, but using the command-line is one of the best. Why? Because it helps you get around potential problems like execution timeouts for tools like phpMyAdmin, and potential network dropouts from using a local administration tool like MySQL Workbench.
The command to run the backup is fairly small, but may require some explaining:
mysqldump -u mysqluser -p mysqldatabase
Now, to explain what’s going on here! The “mysqldump” program is a tool for creating database backups. The parameters being used are:
- “-u” switch means you’re going to specify a username to connect with, which must follow, like “-u mysqluser” above
- “-p” switch means you’re either going to immediately specify the password to use (with no space), or it’ll prompt you for one
- The final parameter used in the example above is the name of the database to backup (of course!)
If you ran the command above, you would’ve seen the contents of your database go whizzing by on the screen. That’s good, because we know that part works (actually connecting to the database), but it’s also bad, because… where did it go? Answer: nowhere! It scrolled past, and that was it. Now we need to capture it and put it in a file.
To place the contents of the output into a file, for back-up purposes, we need to use what’s called a redirection.
mysqldump -u mysqluser -p mysqldatabase > db_backup.sql
So we added a redirecter, and the filename we wanted the output to go into. Now you should be able to see a file named “db_backup.sql”, and if you open it you can see a SQL script with the structure and content of your database ready for restoration or migration.
One last thing that could be useful for a backup, is compressing the SQL script. For this example, I’m going to use GZip compression, because it’s quite common, but you could also use Bzip2 or something else.
To add compression into this command, we just do what’s called piping. We pipe the output from the mysqldump through gzip, and then redirect it into the file we want, like so:
mysqldump -u mysqluser -p mysqldatabase | gzip > db_backup.sql.gz
I also added the “.gz” to the filename, so I know it’s compressed and not just plain text anymore (it’ll also be smaller!)
3. Restoring from a Database Backup (with GZip Compression)
So you’ve got a backup of your database (either using the method above, or some other way), and something has gone wrong and you need to restore, or you’re migrating it to a new server. You could use one of the other tools mentioned before, but in the example of phpMyAdmin, what if your database backup file is bigger than the allowed upload size? Well luckily, the command-line doesn’t mind.
The command to restore is very similar to the one for backing up. Firstly, without GZip compression:
cat db_backup.sql | mysql -u mysqluser -p mysqldatabase
We use the “cat” command to output the contents of the backup script, and pipe its contents into the mysql program. As you can see, the mysql program takes the same options as the mysqldump one does in section two.
Now if the script was GZip compressed, we can’t just output its contents into mysql, as it will be compressed data instead of a nice SQL script. So we do the following:
gunzip < db_backup.sql.gz | mysql -u mysqluser -p mysqldatabase
See, it's very familiar, just switched around a bit.
What's happening here is we run 'gunzip' too and redirect the backup script into it to be decompressed. We then pipe the decompressed output into the 'mysql' program.
4. Find / Replace in a Text File
Sometimes you have a big file, like maybe a database export, and you need to do some find / replace on it... but it won't open in any of your text editors, because your machine runs out of memory trying to open it! Well, here's a way around that, by using the command-line and a little regular expressions.
The way this works is to output the contents of the SQL script (or whatever file you're using), pipe it through a program called 'sed,' which is specifically form manipulating streaming content, and then redirect that output into the new file. Sound complicated? Well... I guess it is a little, but the command itself looks simple!
cat original_dump.sql | sed s/Japheth/Japh/ > new_dump.sql
The new part here is really the 'sed' program. Basically what it's doing is taking input and matching the first pattern (in this case, my name, 'Japheth'), and replacing it with the second pattern (in this case, a shortening of my name, 'Japh'), then outputting that.
5. Securely Copying Files to / from a Server (over SSH with SCP)
If you're working on the command-line and need to copy a file, especially if you need to do it securely, why go and fire up your FTP client? Just use a program called Secure Copy, or SCP, which is especially for doing remote file copying securely. Secure Copy uses SSH to copy the files, so you need to make sure you can connect to the remote computer via SSH first (I'll talk about this a little more at the end of the article, so hold that thought).
The syntax of the scp command is similar to that of the cp command covered in section one, with the addition of the hostname of the remove computer and the username to connect with:
scp /path/to/local/file username@hostname:/path/to/copy/to/
The bits to note are 'username@hostname:', which, as I explained above, are the username to use and hostname to use when connecting. You will be prompted to enter the password for that user, and you also will get a progress indicator for the copying so you can see how it goes.
You can use the '-r' switch (note: it's lowercase for scp, uppercase for cp) with secure copying to make it recursive. Also, if this is the first time using SCP or SSH to connect to the remote machine, you may be asked to accept an RSA fingerprint for security, which you should accept (assuming you're certain you're connecting to the correct server).
It's worth mentioning that this works both ways. You can also copy files from the remote computer to your local machine by switching the arguments around:
scp username@hostname:/path/to/remote/file /local/path/to/copy/to/
If you're SSHed into one web server, and you want to copy files to another one, you can use this command to copy the files directly without having to download them to your local computer first!
6. Finding Specific Files in a Large Project
Finding a file with a particular name
Want to find a specific file but not sure where in the many directories of your project it's hiding? (or even if there's more than one!)
find ./ -iname 'index.php'
The 'find' command is for locating files within a directory heirarchy. It has many options, so its uses are quite varied. Here I've specified to search in the current directory with './', and used the '-iname' switch, which means to search for a file with a name like the one I supply. There is also a '-name' switch, but the '-iname' switch is case-insensitive, so it'll find INDEX.php as well.
Finding a file with particular content
Ever known that you had written a function for something, but can't remember which file it was in?
grep -iR myFunction ./
'grep' is a program for printing out lines that match a particular pattern. You can provide it with some switches, like the '-i' for making it case-insensitive, and '-R' for making it recursive in my example. Then provide a pattern, and the path to search in (here I'm searching the current directory with './'). This example will show the filename and the line in that file for any matches it finds to 'myfunction' (case-insensitve because of the '-i').
If your projects are Subversion working copies, you may find that it's annoying to see results from the '.svn' directories. To exclude particular directories from the search, use the '--exclude-dir=' switch, for example '--exclude-dir=.svn'.
7. Performing Bulk Actions on Specific Files
Now we know how to find particular files; what if we want to do particular things with those files? For example, I often work on a Mac, and find that when I save files to Windows shares or Linux Samba shares on the network, Mac OS X kindly litters '._filename' files everywhere. So I like to be able to clean these up regularly.
To find such files, I use both methods from the previous section for finding files with a particular name:
find ./ | grep '\.\_.*'
We're finding a way to output all files in the current directory (recursively), and are then piping the output to grep, which ensures that it matches my regular expression. The regular expressions just says, 'match anything that starts with a literal . followed by a literal _ followed by 0 or more of anything else.' Run it like so to make sure you see the desired files.
Now to do something with all the files you captured from that command, you wrap it with back-quotes (``). If I wanted to delete all of them:
rm -f `find ./ | grep '\.\_.*'`
I have the 'rm' command (to remove, or delete, files) with a '-f' switch (which means to force a delete without asking for confirmation), and it will run for each file returned by the command within the back-quotes!
I feel it would be irresponsible not to mention here that you should be very careful using the 'rm' command. If you use the 'rm' command with the '-f' switch, make sure you know exactly what you're going to be deleting, and that you really want it gone! If you use '-f', you won't get a second-chance.
How do I get Command-line Access to my Web Host?
I mentioned earlier in the article about connecting to a remote computer via SSH. A lot of these commands are most useful when used on your web server, which likely runs linux, so you'll need to be able to connect to the command line. The way to do so is by using a program called SSH, which does it securely.
On Mac OS X, or on linux, you can run SSH from the Terminal application:
ssh username@hostname
If you're on Windows, you'll need to use a freely available program called PuTTY.
You will be prompted for your password when you are connecting.
If you do not have SSH access to your web host already, you will most likely be able to request it, and they will set it up for you.
In Summary...
Like most things, 'you don't know, what you don't know.' It might seem difficult to discover how to use the command-line; but there's a huge amount of power available to you once you wrap your head around it! Hopefully, this article will get you started exploring! Any questions?
Naročite se na:
Objave (Atom)